Morning folks. Welcome back!
Sharing progress so far on the Grand Parlor. This room is getting me kind of excited!! However, I also have a lot of frustration at my inability to "perfect" what I am doing. This house will have a lot of
features brought about purely to cover up something!
As you know, I have been working on the ceilings and floors for the Grand Parlor. As usual, I think my ideas outstrip my abilities...but I guess that is how I learn!
After adding my cookie tray to the ceiling to create a base for a carved ceiling, I had some trimming, spackling and sanding to do to create a smooth ceiling texture. My first step was to use
Gesso over the whole surface, which helps provide an adhering surface for the Spackle. After Spackling the cookie tray, I sanded each groove to ensure a smooth surface.
Above is a shot of the process in my "other" work space...the one I reserve for the dirty work. I have a table in my garage where I sit to do this sort of work. Now isn't it just COZY?
Sorry for the side trip! :0) If you look closely (at the picture of the ceiling mind you), you can see that there are lines everywhere that I cut the cookie tray. I spent quite a lot of time cleaning that up!
The process was something like this...Gesso, Spackle, Wait, Sand.... Gesso, Spackle, Wait, Sand... Gesso, Spackle, Wait, Sand.... you get the picture! However, creating a gesso base on this project was important, because I plan to paint the overall surface, and the cookie tray was a slick, non-porous surface, so without a base coat of primer (Gesso in this case), I would not have been able to get the paint to stick.
But it was worth the effort, because what I finally ended up with is this...
You can still see some of the lines in the shot above, but those will be covered up. Each of the grooves is as smooth as silk! (or will be after I sand the heck out of everything again!) My "carved" ceiling will be brought to life with resin castings. Did I tell you I just love resin?
Not really...I just haven't really learned to carve yet, and am postponing that momentous event until I get some of the basics under my belt! So for now, resin is my tool of choice to create the fine details! It IS pretty versatile, and not hard to do...it just takes a lot of time!
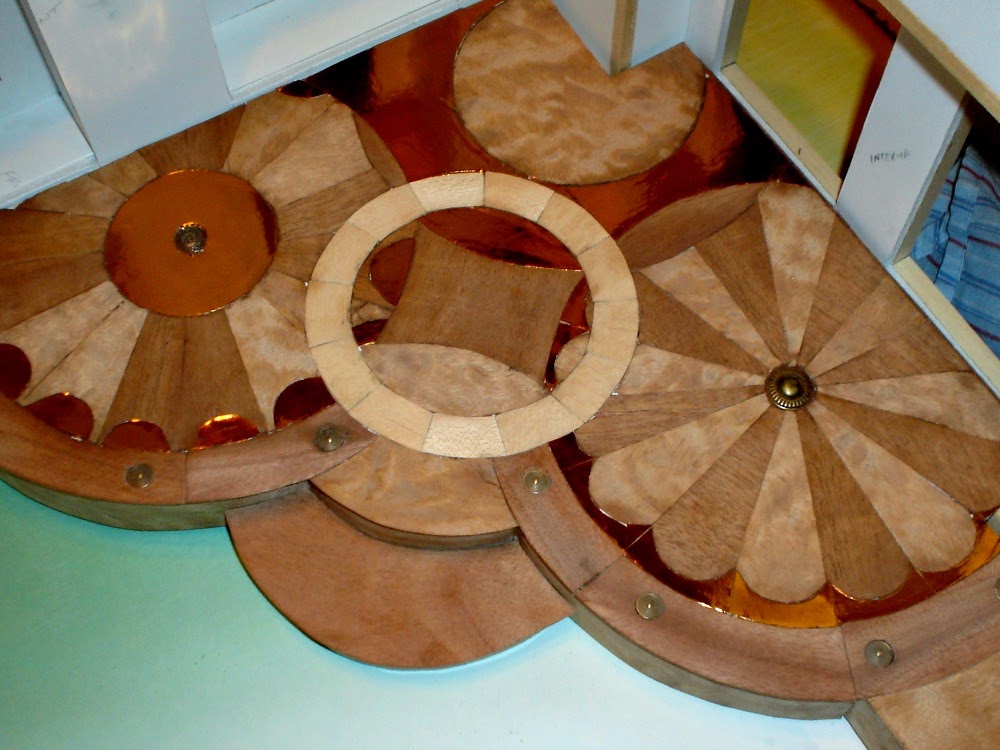
The other project I have been working on is the Parlor Floor. This is what is getting me so excited, and yet frustrating the bejeezus out of me at the same time! I have decided that I will spend eternity cutting flashing off of resin pieces and cutting out small pieces of wood with a utility knife! Oh well, guess things could be worse. :0)
The wood in the photo above is a veneer made of
Sapele Pommele which is native to tropical Africa. It has a wonderfully curved grain that just makes me melt...I love it. It comes in sequence matched packages that I am able to pick up from Rockler's Wood working and hardware store.
Rockler has an Internet store at
Rockler Woodworking Store, but I pick mine up locally, since I live in the big ole city! There are few advantages to living in the city, but that is one of them!
The copper look material is - guess what! - Those paper plates that were part of the "inspiration" for this room. The entire room, as I mentioned before, is built around those plates, the Christmas ornament, and the Double Decker floor!
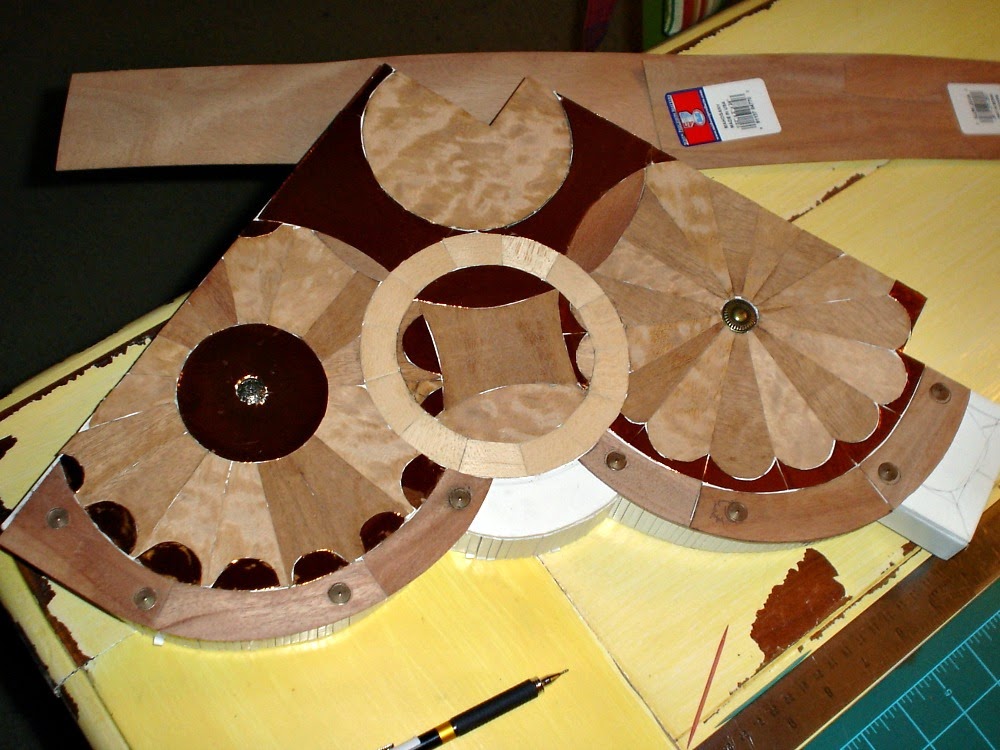
I cut the center out of the paper plates to create a piece that I could cut from. I then created a transfer pattern from tracing paper to help me transfer my design from the floor where I drew it originally, to the paper plates.
To aid in the shaping of the pieces, I cut out paper templates first out of thin paper, adjusted them to where they fit the required profile, and then used those as the pattern to draw and cut the shapes required.
I am also using a mahogany veneer, available through wood specialty stores such as Rockler or
Woodcraft. I love the beautiful contrast between the Sapele and the Mahogany. The lighter wood circle is Birch Wood Tape.
Above you see pictured where I am now in the process. It represents about 12 hours work...lots of trimming and shaping for this floor! I have promised myself that my next floor will not be quite so complex! HA. Good Luck with that, Doug!
You can see in the photo above what causes my frustrations! I got most of it worked out, but I have a gap near the circle above that I will have to figure out how to close. Sigh.
I also want to welcome Vivian as my latest follower! Thank you for joining my wild ride, and for your lovely comments! Vivian has a wonderful project in work that I love. You can see it in progress at
V's Miniature Manor. Be sure and pop over and enjoy!
Well, for today, that is all! I must tell you, I love that I am able to share this with you all. While my family appreciates my work...they are not "miniaturists"! They don't completely understand my obsession with cutting little tiny things all the time. So it is good to know that I have some "friends" in cyberspace that know what this is all about!
Until next time!
Doug S
.jpg) This came across on one of those streams...and it is something I want to share. This incredibly amazing work just has to be shared!
This came across on one of those streams...and it is something I want to share. This incredibly amazing work just has to be shared!