We begin a New Year! I am excited about this year and what it will bring. I hope you also are!
I thought that for this post I would share the process I used to create a stone sink for my Steampunk kitchen. It took me quite some time to work through how to do this, since it is a piece that does not have regular edges or sides.

I considered using either polymer clay or wood to create this piece, and finally settled on wood, mostly since I had the materials on hand and would not have to buy additional things to allow me to use the polymer clay. In the end, I think this gave me a control level I might not have had with polymer clay for this piece.

I left my last post with the above picture and gave you an opportunity to guess where it was going. The answer to that question was that this was my mock up of the kitchen sink, to help me finalize both size and shape of the sink. There will be two sinks in this kitchen, this one, and a second sink that will be a next generation sink. My little people were very smart and kept their old sink and just added the new fangled sink later!
I wanted to include a variation of this sink in the kitchens because I had seen one in a historic house here in Everett, Washington, and I fell in love with it. It was about 10 feet long, made entirely of a tannish colored stone, and was located in a home built in the 1900's with a 'real' scullery! This sink was located in the scullery. I really wish I had a picture, because my version will not do justice to it at all. It was imposing and wonderful. Mine had to go in a tiny little space, so you have to imagine this sink as elongated and massive to get the 'real' effect. But I thought this was worth including a version of it, as it is different than the run of the mill sink, and fits my theme well.

As I have already mentioned, I built a mock up first. I have never carved wood before, and I was unsure of the actual shape I needed given the fact that I had to "shrink" the original. I needed an 'easy' medium to work with to carve this irregular shape on a trial basis. I settled on Irish Spring soap. Now you know something about me that most people in my closer circle don't! :0) Keep it a secret, OK?
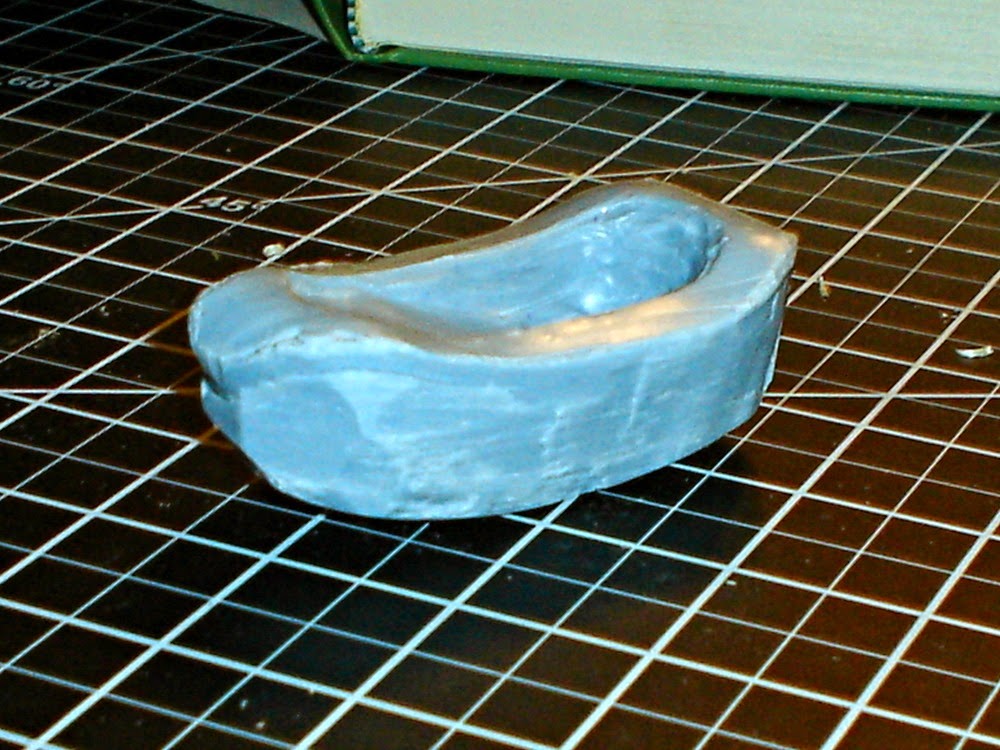
Using my new and very cheap carving tool set, I created a shape that approximated what I wanted. You will see that I adjusted this somewhat as I went along, but this helped me set the basics and figure out what I wanted.

To begin the actual process of creating the 'stone sink', I glued up four small pieces of basswood into a rectangular shape that approximated the final size I had decided on for the sink itself. I drew the basic shapes of the planned sink onto the glued up stock.

The first cuts I made on the basswood blank were what are called 'stop cuts'. I wanted to include an edge, or lip, for the sink. These cuts act as a 'stop' for the carving knife, which aided in getting a smooth edge created. To create a stop cut, you can use a straight chisel and lightly tap it down into the wood with a rubber mallet. Be sure to place the chisel on the waste side of the line you will be following, as the knife will 'part' the wood, and may cut into the wood you want to keep if you place the chisel directly on the line.

Place stop cuts at the bottom of the wood blank as well. We will be cutting away most of this wood, but the stop cuts at the bottom help to establish the oval shape you will be using. I cut away only the wood outside these stop cuts originally, which allowed me to establish the clean shape, and work from that to create the rest of the stone sink shape.

Upon completion of the rough shaping of the wood blank, I had a shape that looked much like an elongated top hat! As I carved out the rough shape, I left the lip along the top edge of the sink, and carved the oval shape only below this set of stop cuts.
I then drew guidelines using a compass for the bottom of the sink. I wanted the sink to look like one large stone that had been carved into a sink, so I wanted very rounded and somewhat irregular shapes throughout the piece. These lines provided me with a basic guide to ensure that I was evenly shaping the overall shape, while allowing me the freedom to consult my muse.

Before shaping the bottom of the piece, I began carving out the rough shape of the sink floor (from the top). I used a curved gouge chisel to rough out this shape. The floor of the sink will be deeper at one end than the other as you can see in the final photos.

Once I reached the depth that I wanted the sink to be at both ends, I added one more set of stop cuts in a half circle in the deep end of the sink. I wanted to create a well that led to the drain at the bottom of the sink. These stop cuts allowed me to achieve a smooth circle shape from which to work. I continued to chip away wood within the half circle in order to create the drain area. For this I used a combination of the straight chisel and the curved gouge chisel.

Upon achieving the shape I wanted, I sanded the bottom of the sink (inside) and used a drum sander to form the underside of the sink as well. As you can see, I sanded away a good portion of the bottom of the original top hat shape, again, going for the look of a large rounded rock that has been shaped.
I also chipped away at the lip of the sink, to roughen it (after sanding it smooth) and create the illusion of a rock shape. I drilled a hole through to the bottom of the sink to allow me to set up a drain pipe below it. Unfortunately, I didn't quite get that centered (and I WASN'T going to redo the rest of the project!) so I had to redrill next to the old hole. (Don't try this at home!)

For the sink drain, I used the female end of a snap. It is a perfectly in scale shape that I think looks just like a large drain. This will eventually be painted up, but for now, it will rest as is in the sink.

The last step I took was to use a stone texture that I sprayed on using Valspar's Stone Spray. It gave a wonderful and consistent stone texture. I used a Dark Granite colored stone, but this will not be the final color. Once the stone paint texture drys entirely, I will probably work to adjust the look to be a bit more varied.
This wraps up Part 1 of the process. This far, the project has been a fun project, though it required a bit of patience! This process could be used to create any sort of stone look tub or sink, with some adjustment. Try it out some time! I will be posting soon with the completion of this sink project.
Until next time!
Doug S
Hi Doug! Your sink could be the type called a trough sink!? I have seen some that are indeed very long and quite shallow. The fact that you have hand- carved yours is yet another feather in your cap! Good Job! Your sink is " Manly, Yes, and I like it too!" :D
ReplyDeleteelizabeth
Hello Elizabeth! Yes, I suppose it is a trough sink, though not what I normally think of as a trough sink! But that certainly describes it better than any other title I could come up with! I did a search before I posted to try and figure out what it was called, and was not wise enough to arrive at that conclusion! lol. I just knew I liked it!
DeleteA 'manly sink' huh? I never thought of a sink that way! I'll take it though! Luckily, sinks are one of those things that take just about any shape with a 'hole' in it, so my stubby little sink still works though it doesn't have the length that made it so memorable for me when I first saw the original. I'm excited to continue building the counter for the sink. It looks a bit like a fish out of water without the counter!
Thanks Elizabeth!
Doug
Doug, this sink is absolutely perfect, I loved it how you carved/cut it from the basswood, than sanded it so smooth! Now after you've spayed it, it looks a bit rough...? Can you sand it once more for a smoother surface, or do you leave it like this....?
ReplyDeleteI've ever made a sink (straight), but then I've used a toothbrush, put some paint on the brush and I used a very fine tea strainer for splashing with black and white paint on the sink, the result is like yours but smoother. Moreover it's easy to work with and you can use any color you wish.
So, you use Irish Spring soap......okay, I'll keep it secret, hahaha :D LOL!!
Elizabeth tells some things about "manly" sink (I'm very curious what that will be ;O?) and a through sink. But for me those words are too difficult, the Google-translator always translates words literally, so you probably can guess that I absolutely don't know what this all is about ;O! But it absolutely doesn't matter, but I'm afraid that my comments are not much of a help for you....:)!
I wish you a nice day! Ilona
Hi Ilona! I love your comments. They always make me smile!
DeleteGlad you like the basic sink. I also see the rough texture left by the Stone paint, and it does sort of make things 'out of scale'. I have some ideas about that I had hoped to implement, but not sure they will work yet, so hadn't shared them. But I was thinking about (after additional coloring) coating everything with Modge Podge, which should obscure somewhat the size and depth of the "stone" on the wood AND add a bit of additional stony look to the piece. But I need to thoroughly test that before I commit to it! : 0) I like your process for stone color as well, I'll play with that some. Thank You for sharing that!
Elizabeth was saying (loose translation Elizabeth) that the sink looks like it was made by a man (appropriate for men), and that the sink was a 'like' a long narrow water container like a horse would use, in other words a 'trough" sink.(trough sink is the English name for sinks that are long, narrow and shallow). So hopefully that helps! Between us all, we'll force you to learn all our myriad variations of words in English!
I am so glad for your comments, they are always so fun and welcome!
Thank You Illona!
Doug
No,no no! You and Ilona are both incorrect.
DeleteWhat I was referring to was an OLD IRISH SPRING SOAP T.V. COMMERCIAL, where the Irish guy says that he uses Irish Spring soap in the shower and the Irish lady says with a lilt in her voice, that the SOAP was ... "Manly. yes! But I like it too!"
Obviously, you did not memorize t.v. commercials as often as I did, Doug
mystery solved :D
Elizabeth, that is so funny! I cannot believe I forgot that commercial! How many YEARS did that thing run. It got rather old if I recall! The oblique reference entirely escaped me. But all is now clear!
DeleteThe lovliest part is that my misunderstanding is now recorded for all history! I have now made my mark! :0)
Mystery solved!
Doug
Hi Doug! You HAVE indeed, made your Mark! :D
DeleteRight after I left here, I googled up Irish Springs t.v. commercials and THERE IT WAS! and there I WAS, right back into the 70's again! hahhah
Who knew then that what we once thought was all washed up and off the air forever, would eventually still be floating around, to be retrieved at our personal command many decades later! ?
Technology.... you gotta love it! :))
... the 70's, the 80's,the 90's - they were all the same! I knew I was being indoctrinated, but I had NO IDEA how PROLIFIC those commercials were! I just looked them up too, pages and pages of the same commercial! I guess if must have worked on me!
DeleteHi Doug, you really give everything a go!!! :) I love the sink. It has a true 'heavy' stone look to it....and you have brilliant carving skills to add to your list of miniature making qualities. I wouldn't even dream of trying that....good for you. Of course, using anything Irish probably has rubbed a little luck off for you :) LOL
ReplyDeleteTruly, the sink is looking amazing and, again, I am looking forward to the next instalment.
All the best
Vivian
Hello Vivian! I didn't always try new things. I used to have "performance" anxiety to the point that I could hardly do anything! But I got "old" enough to realize that most people had other things to do than find fault with what I did, and got tired of being afraid to try stuff. I made a decision several years ago that I was going to learn what I wanted to learn, and not worry about what folks thought of me. It helps that I absolutely love to learn. My brain MUST be kept busy or I go wonky! :0)
DeleteI'd probably beg to differ with you about my "brilliant" carving skills! I bludgeoned my way through this just like so many other things on this miniature project. Again, the learning thing. I love learning new things, and perfecting the old things, so this hobby is absolutely a great fit for me. I don't have to spend 500 dollars to learn how to build a sink. I can do it for under 10! :0) And I think you are right. It WAS the Irish thing now that you mention it! I am sure of it! lol
Have a great day!
Doug
Newest Baccarat, Craps and Roulette to Play - FBCasino
ReplyDeletePlayers can place bets, check the box, and take home a prize 바카라 검증사이트 of $1000 or more. All bets must be placed after the bet has been placed. With this, the odds will