Hi folks! I hope you are all enjoying the countdown to Christmas! I know I am. We've been able to see family and friends, and are enjoying finding those special gifts for our loved ones right now. But I am most excited about the time I will be able to spend with my family during the holidays. And of course the time I hope to spend on working on my Steampunk Chateau!

My latest project has been to put together the brick walls for the Kitchen module. I have a very specific goal in mind that will unfold in future posts, but in the meantime I wanted to create the warm colors of the Tuscan landscape in the brick treatment. I also wanted a great deal of variation in the color for the brick walls.
I thought I would share the process with you that I used. I am looking at the photos, and of course I am now picking them apart, so you'll probably get a later update with some last minute adjustments, but the basic process was still fairly successful, and I thought folks might enjoy seeing how I went about it. It's that camera thing again. It "tells the truth", and cannot be ignored. The obviousness of the different color patterns entirely fades away in real life. Oh well. Always have to be camera ready, right? I think that can be taken care of with a bit of paint magic.
This is definitely another work in process post, but I know I enjoy seeing how people do things, so I am hoping there are a few of you out there that also appreciate that.
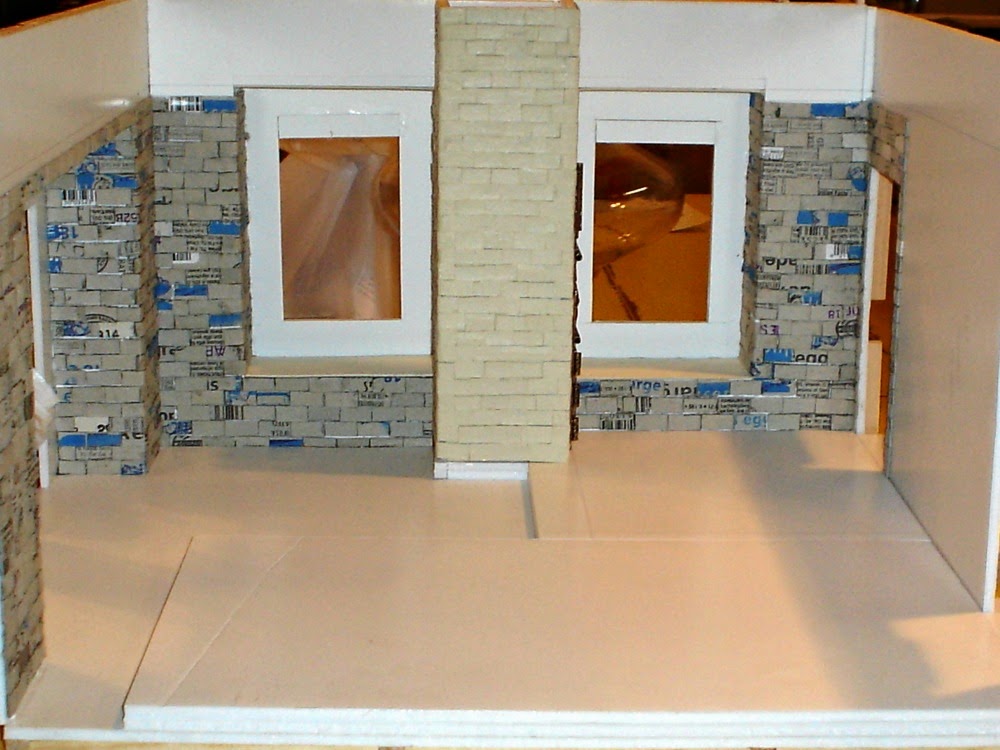
The final result of the added brick was worth it though, as it already begins to define the spaces I had in mind.

I also painted in the first coat of the color I was going to use in the window wells. This color was 'Harvest Gold'. I may adjust that as I think more contrast may be needed in the final result.

My next step was to minimize some of the variation of the "bricks" by using unsanded grout to fill in some of the gaps that were left once the eggshell brick was applied. I wanted to bring the gaps more in to scale. It also adds some additional texture, which was an added bonus.

To bring out the details of the brick courses, I applied a single coat of Indian Ink to the brick walls. This picked out the details in the brick very nicely. In a few places where the gaps were filled too deeply with grout, I did cheat a little and draw lines in. You can see some of those to the left in the photos. I was very unconcerned about getting everything perfect, because I planned to overlay the entire thing with the brighter colors. This layer of Indian Ink was to help add an undercoat to aid in creating detail and dimension to the brick wall color in the end.

At this point I began layering in the color. Above you can see the first coat of color I applied. I used quite a list of colors to obtain the color variation I hoped for. I've listed the colors in order of application below for those who may be interested in the process.
Each coat was applied using a sea sponge, with successively less complete coverage, again, I was looking for varied color coming through to the surface.
I decided not to take pictures of each step. There would be a somewhat boring litany of photos with slightly different coloration, and I didn't think that would be too terribly interesting to wade through!
However, here are the colors applied in order of application:
- Valspar Latex Paint - 'Cliveden Sandstone" applied as a full coat. This was the same color used on the original dumbwaiter.
- Indian Ink coat diluted in rubbing alcohol (as seen above)
- Folk Art Plaid 'Tangerine' (orange)
- Ceramcoat 'Straw Paille Paja'
- Folk Art's 'Turners Yellow'
- Americana's 'Burnt Sienna'
- an additional coat of Folk Art's 'Turners Yellow" with about 50/50 ratio with Floating Medium
- Craftmart 'Khaki' with 50/50 ratio of Floating medium
Yes, it took me all day. :0) But I really like the color variation and glow that is in the "brick". As I mentioned earlier, I will probably put one more coat of paint on the surface to smooth out the edges and blend the colors better. Once the colors are more uniform in appearance, I think I will be very happy with the result.

You'll have to let me know if you want to see these "interim steps". Things look more than a little rough in these photos, as I haven't trimmed out anything or even attempted to tidy up the edges. I have a hard time knowing what folks might find of interest, so for now, I am posting these bits of progress.
I'd also like to welcome a couple of additional new followers! I am so glad to know of you, and look forward to perusing your blogs in the near future and getting to know you!
So it is time to go off and enjoy preparing for Christmas! Remember to enjoy the season and don't let it descend into a stressful experience! It is too special a time to leave to chance. Plan now to stop and smell the roses as you prepare for celebration and you will have a very Merry Christmas season!
Until next time,
Doug S
Hi Doug! Whilst I was starting to read this blog, I realised that there was something 'wrong', because I think I've missed a blogpost of you....:S! I'll go and see, be right back!
ReplyDeleteIlona
Back again :)! Cutting egg cartons for some days, what a dull work, but the final result of the added brick was worth it, that's for sure! I thank you for explaining how you build the house and for explaining the materials you use. Reading your posts is always time consuming for me (don't get me wrong, I like to read them) but I also have to translate lot of words into Dutch and then I learn a lot of technical terms in English. So, maybe one day I'll write a blog post in proper English too :D LOL!! Okay, I won't bother you with that issue again...;D!
ReplyDeleteUsing more layers of colors will give your walls more depth, just like you did. But the way that you've building up the chosen colors is for me completely new. I've never worked with Indian Ink and alcohol and a floating medium, but I do like the result it's great.
Photographing the colors can be hard on a winters day, I now have the same problem in these days. Because we are living now "in the dark days before Christmas", as my late Mom used to say.
I wish you a wonderful Christmas time and a Merry Christmas to you and your family!
Kind regards, Ilona
Hi again Illona!
DeleteI am so sorry! I just naturally use a very large vocabulary, I have read books all of my life, and have learned all those big English words. I also tend to use a lot of "slang" in my writing. It is all just natural to me, and I really do not notice it! On top of that, we English speakers seem to rearrange the order of words compared to most other languages. I know when I translate blogs from other languages everything seems backward to me (example "house mouse" instead of "mouse house" which we would use) So when English is a second language, I can see that it would take a while to get through my posts! I really will try to do better. :0)
In my earlier post called "The Inidan Ink Affair", (August 2014) I show you how I made the alcohol and Indian Ink concoction that I used for this project. It is easy to make!
Floating medium is wonderful! It allows you to thin out paint so that it lays differently, less opaque. It also extends the time that the paint takes to dry so that you can manipulate the color a little longer. My wife does a lot of painting, so she tells me all about these little tricks. I am fortunate to have her around!
So much for me to learn about photography! I am constantly amazed at what I miss when looking at these projects in real life. The camera is merciless! I will learn, I always do, but I am a bit embarrassed at how amateurish some of my projects look after my photography skills get a hold of them! Just one more thing to learn!
I hope you also have a wonderful Christmas season! This is my favorite time of year, mostly due to the wonderful family memories we create! I wish you the same!
Doug
Hi Doug,
ReplyDeleteAgain, another jam-packed post full of very useful tips. I know how patient you have to be to do all that brickwork.....my kitchen chimney breast comes to mind lol. :) I think the use of bricks will make your working kitchen areas very rustic, but with finishes like the dumbwaiter, will escalate it to having a more opulent feel.
Keep up the good work...:)
All the best
Vivian
This comment has been removed by the author.
DeleteHey Vivian, Yes, patience is the word. I got very tired of cutting egg cartons up! But one step at a time. I did, after all bring it on myself, so I don't know why I think I can complain!
DeleteI agree with your assessment. I hope to create a contrast between an aged vibe and the elegance of rich textures and shapes. I really want the "faded elegance" vibe when I am done.
I think your brickwork is much neater than mine. :0) Mine has the "irregularity" of old brickwork...good thing that is what I generally want. I doubt I could pull off the neat brick courses you created on your kitchen chimney yet. But I learn more every time I try a new project. Some day!
Thanks!
Doug
P.S. Darn my spelling! I had to correct it, I couldn't stand it. :0)
Hello Doug,
ReplyDeleteThe brick walls are perfection and thank you for telling us step by step how you finished them. This will be an amazing kitchen.
Big hug,
Giac