More Pages

Showing posts with label Iron Sink.. Show all posts

Saturday, March 28, 2015

[Overheard in The Forum]
Kitchen Faucet Tales


Greetings,
Strange happenings at the faucet.  
Sink has a faucet with a Steam Punk look and a spout able to rotate.


When the hot tap is turned on fully the water runs warm only

and then runs cold and back to warm again. It never runs fully hot.

The sink is a  couple of feet away from piping hot water.

The supplier says to switch the cartridges between the Hot and Cold

levers. This does not sound right. Its a fancy Steam Punk brand.


Some insight would be appreciated.


Oh the joys of learning on the fly!  I've had a fun couple of weeks [yes WEEKS] figuring out my Steam Punk Kitchen Faucets.  The lessons learned are too many to list, so I'll provide you with the short cut!  How is that!?

Nah!  That would be no fun.  So I'll show you how I made a set of Steam Punk Kitchen Faucets with only a COUPLE of side trips.  Rest assured, this was only scratching the surface when it comes to detours on this project!

The funny thing is, once you "know what you are doing" (maybe a stretch!), this little project is actually fairly simple to accomplish.  I'll attempt to impart the great wisdom I have gained as I wandered far and near.  This should make it very simple for 'the next guy'!


Presenting the materials required for this project.  So Simple.  Beads and wire, Beads and Wire.  Simple. SOOOO Simple.  Yes.  So Simple.

I should share that this idea was not my own.  I stumbled across a tutorial at Nasu's Dollhouse, which I adapted to make this faucet set.  Hers is much more professional looking...  I'd tell you it is my photography that caused mine to appear less polished, but I would be lying!

OK, back to the faucet tales.  I used various beads, some very small springs, and 20 gauge [modify that to 16 - Lessons Learned!].  I had to do it over again, because the wire wouldn't hold up the final product!  So use 16 gauge wire if you are foolish enough to try this at home!


Droopy faucets :'(( 

Once re-assembled using 16 gauge wire, the outcome was much better. But I get ahead of myself.


Using the assortment of Steam Punk themed beads and wire, I strung the beads onto the wire, and bent the ends to create a return on both ends.  Each bead was glued [Lessons Learned dictates Super Glue for those quick on the draw!] to the wire, so that it remains stationery.


This is one of those beads that is threaded to use as a clasp on a necklace (no I don't know what they are called!)  I glued the connector bead on top of the squared bead in the center to create a pipe traveling upward.  By using this threaded piece as a pipe routed upward, I have a "working" faucet.  [OK, no.  It just swings from side to side. Nice, huh?  :0))  ]


For the faucet itself, I used 12 gauge wire, and bent it into shape.  I super glued a bead finding at the base where the faucet would meet the wall.


I super-glued two additional beads to the faucet end to create the spout. [For the observant ones, this was NOT superglue on this photo.  Another lesson learned!]


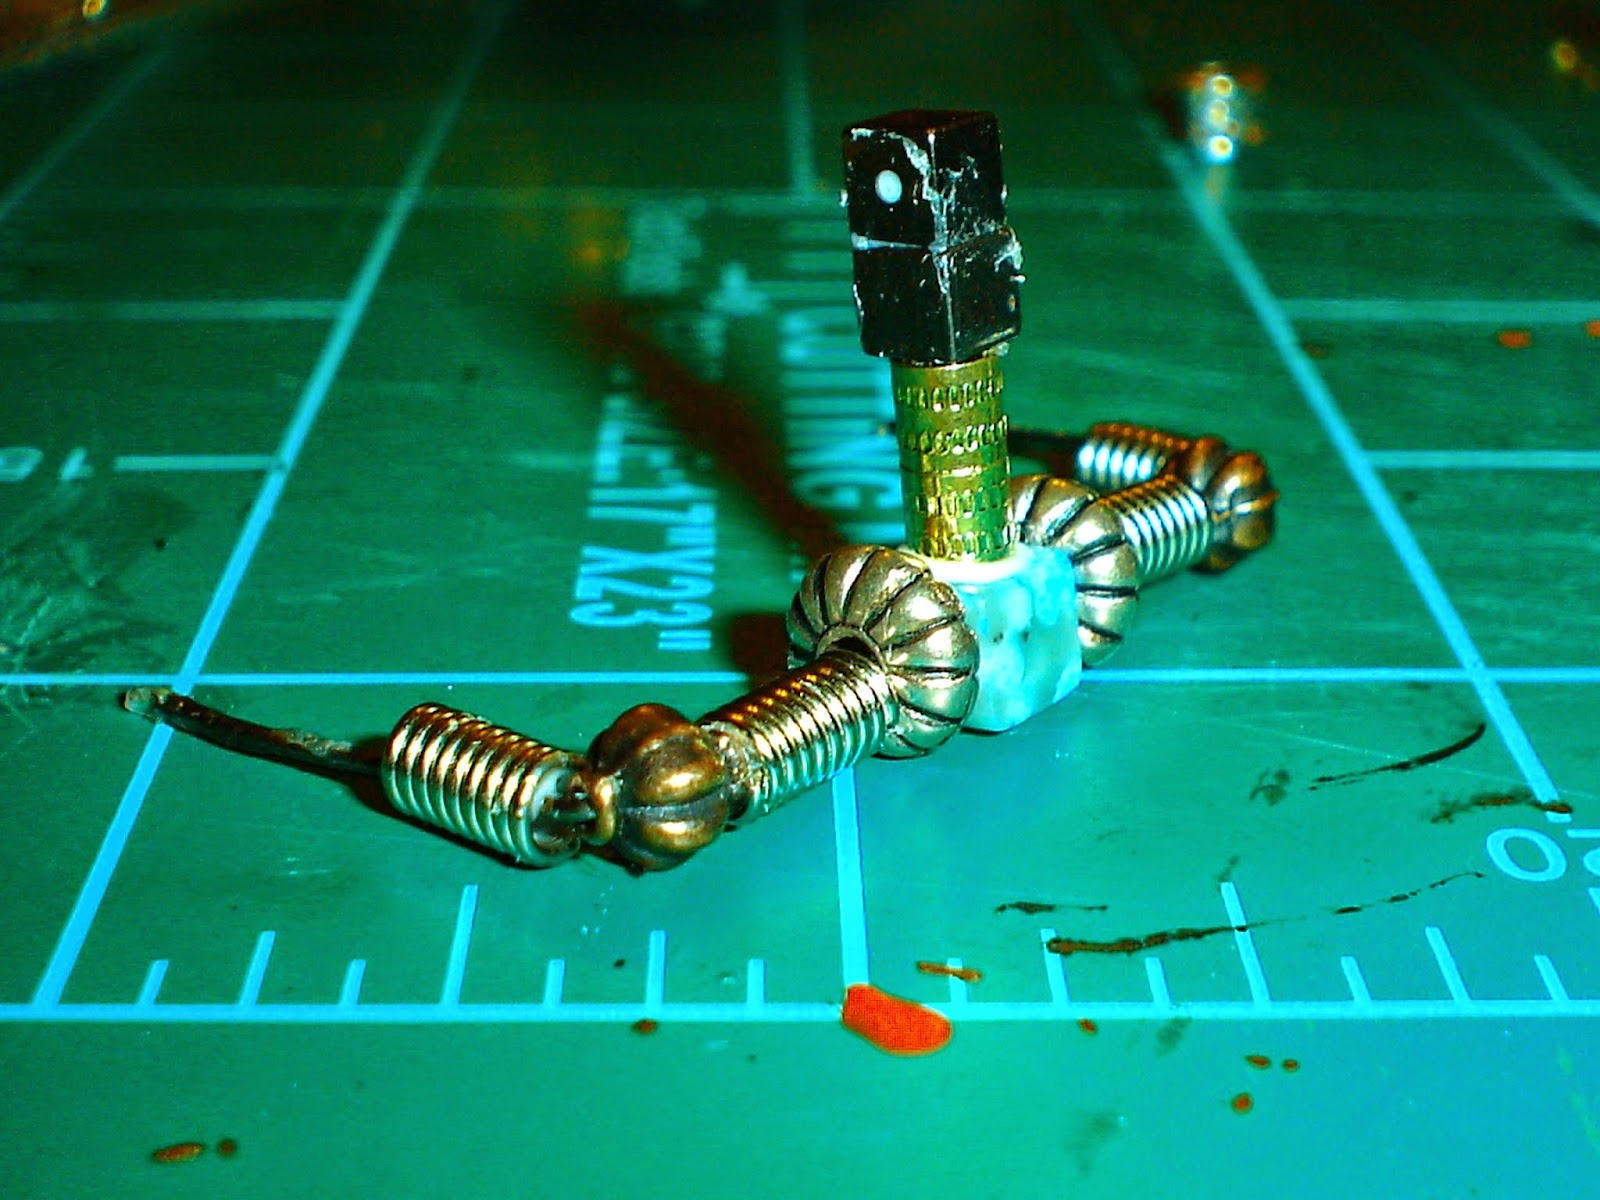
Added two additional square beads to the top of the connector bead . . .


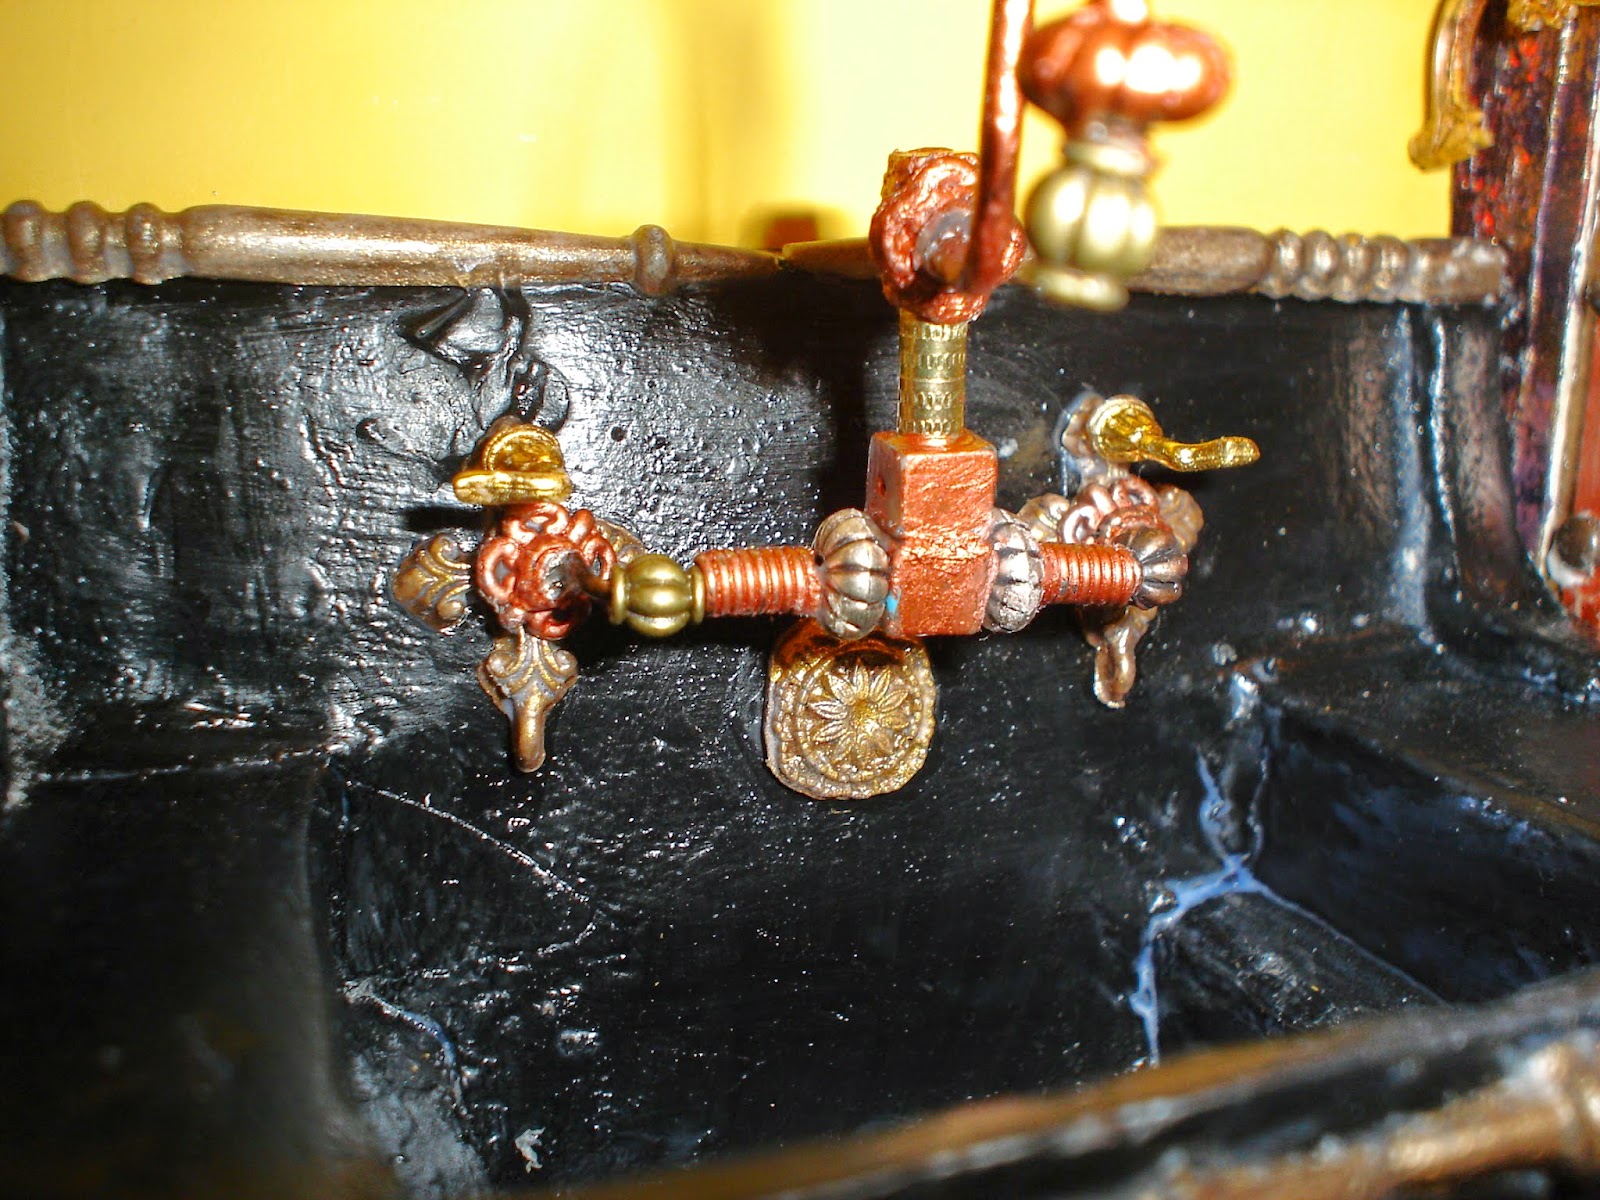
and then added some additional beads to create a decorative element.  I painted several of the beads to a copper color, to create the elegant metallic effect I wanted.


Painted the faucet assembly. . .


And assembled the entire thing using a combination of Arlene's Tack Glue and Superglue.

This is the point at which I discovered my droopy faucet problem.  I could not get the wire to hold up the assembly, as the weight of the beads and wire was too much for the 20 gauge wire I had used.


As you can see in the above picture, the entire assembly looks just slightly different.  I used the same exact processes, but used 16 gauge wire instead.  You can just see the difference in sturdiness.  Much better.  

I also shortened the returns on the wire, and left off a couple of the springs on the rebuilt faucet assembly, again in an effort to solve my droopy faucet syndrome.  


It worked like a charm!  I super-glued the entire assembly to the sink using very small holes drilled into the back-splash of the sink.  Superglue is a wonderful thing.


I added the small Victorian faucets which I bought at the Seattle Show, and declared the sink done!


Oh.  Of course I must share the tiniest little detail, yes?  I also did another little project to add final details to the Steam Punk Kitchen Doors.  I added some door handles.  Worth sharing, right?  :0) 


That's all there is folks!  Not so much for four weeks is it?  Some battles are hard won, but those are the better for it! 

I am excited now to move on to the Box Windows on the Exterior.  I have some wonderful ideas for those, we'll see if I can pull them off!  

Until next time!

Doug S


P.S.  I really did find the opening piece on this post in a forum.  I thought it was funny, and tweaked it a bit to fit my post.  No, my house will not have running water [THIS time!]


Friday, January 30, 2015

SITUATION WANTED: Working Butler; Quiet Family


Hi there folks!

As promised, I am here to drag you through the creation of my latest addition to the Steam-punk kitchens!  I had a lot of fun with this little project.   It was a fairly simple project, one that I think just about anyone could build with a little patience.    


A Little Aside

First, the obligatory photo of the Butler's Pantry as it stands now.  The Iron Sink now has six new legs (Newel Posts turned upside down!), and a new matte finish. Almost done now.  Just needs a faucet set and it will be complete.  The faucet set will likely sneak in unnoticed sometime in the near future!


A Little Bit O' History

Before I get into the making of the miniature plate rack, I would like to share just a bit of history I find interesting about the Butler's Pantry.  We have a modern day view of the Butler's role, and of the Bulter's Pantry as a sort of staging area for the dining room.  But the history of the Butler's Pantry is a continual merging and separating of the roles of various rooms and domestic service jobs that was shaped by social and economic history.

The Butler, by the Victorian Age, was both a butler and chief server.  The Butler's Pantry functioned in many capacities, combining the functions of many of it's predecessors, primary among them the Butt'ry, the early storeroom for casks and bottles of wine, and the Sewery, or Servery, which was historically used as the primary staging area for serving the dining rooms, and was the repository for fine plate, silverware and valuable service-ware.


Courtesy of The Queen's Scullery (SJ Alexander et al.) / CC BY-NC-ND 3.0

In the grander homes, the butler may have actually slept in the Butler's Pantry, as a deterrent to servants "of base character" stealing the valuable dinnerware of the grand home.   The Butler's Pantry of the Victorian age functioned then as an office of sorts, from which the Butler ran his household, managing the log books for wines, servicing the fine plate and the fine personages of the house. From this room, he staged fine dinner parties and managed, in wealthier homes, a large staff of servants.  


Photo Courtesy of "Cooking with Glitter" Under Creative Commons License


Serving as a butler in a fine home was a profession, by the 19th century, that became a science.  Butler's were coached and trained by their more mature predecessors, books were written about how to best serve, clean, and manage the furnishings and important tasks of the butler's service.  In one book written to transfer the important skills of the butler and footmen of the Grand Manors during the early 1800's, this writer admonishes his readers . . .


"Some however, have much injured the plate intrusted to them, 
by making experiments of different kinds upon it." 


'The Footman's Directory and 
Butler's Remembrancer', J. Hatcher and Son, London 1823

The writer goes on to provide detailed instructions as to how to best to wash, clean, and refurbish the plate. That quote made me wonder what kind of experiments would "much injure" the plate?!  Were they using acid?  :0)

If you find the tidbits above interesting, take the time some time to read up on these domestic servants, and the history of these erstwhile important rooms of the Victorian era.  It is fascinating, and in the case of the butt'ry, it's history boasts roots from ancient Egypt!


How Did He Do It?

I know you have been waiting with bated breath to find out how this plate rack, which will help our Steam-punk Butler discharge his duty admirably, was built.   Some of you may be ready to expire by now.  Well, wait no longer.  We've finally arrived!


Step 1:   

Cut and drill holes through the shelves.  Mine were about 5 inches long, 1 inch deep, and 1/8 inch width.  I used a 1/16 inch drill bit to drive the holes, and drilled all four shelves at once, so that the holes would align top to bottom.

Step 2:   

Cut the back to fill the desired space.  I used 3/32" mahogany lumber at 5 inches by 5 inches.


Step 3:

Stain or finish the shelves and the back to taste.  I used a Minwax Stain Pen called Golden Oak.

Step 4:

Attach the bottom shelf with Glue.  I used Arlene's Tacky Glue.  Use a toothpick to remove any excess glue.


Step 5:

Cut dowels that will intersect the holes through all four shelves.  My shelves were approximately 1 inch apart, so I cut my "dowels" at about 4 3/8ths inches, to account for the width of the shelves.  I used fake "blood grass" from Hobby Lobby for the dowels.  The natural appearing "wood" of the stem was 1/16 inch in circumfrence, and was reinforced with a strong metal rod inside.  It was perfect for the job.  I used tin snips to cut the metal rod after measuring.


Step 6:

Test for a good square fit.  If the fit of the shelves is not perpendicular to the rods to create a neat square, recut and redrill the shelves.  This is an important step, as if you miscalculate, your dowels will not look straight once assembled.


Step 7:

Once satisfied with the fit, glue the shelves into their intended location. Cut and stain supports if desired.  I cut my back supporting pieces out of 3/32" lumber, 3/4 inches deep, and mitered the corners.  Alternatives to this treatment would be to place 1/16" square pieces of lumber under the shelves.  They will need some sort of support, unless you know something about glues that I don't!


Step 8:

Glue in the dowels.  I used Arlene's Tacky Glue and a toothpick to fill each hole and then put the dowel through all four shelves.  As you can see, my method was a bit messy.  I am sure someone knows of a better method!  I used the toothpick to clean up the puddles of glue at each hole.  It cleans up nicely with a toothpick, and as long as you have already stained the wood, is not apparent once the glue dries.


Step 9:

Stop and allow the glue to dry thoroughly.  Failure to do so will cause the piece to go out of square.


Step 10:

Cut 3 additional pieces to finish off the top, bottom and backsplash of the shelf. Mine were 3/32 inch mahogany, approximately 5 inches by 1 inch. Sand and clean these well, as they are your finish layer.


Step 11:

Glue on the finish layer.  Here I am applying the finish layer for the shelf backsplash which I painted to match the wall behind the shelves.  Be sure to clamp or hold each finish piece until reasonably dry.  These thin pieces of wood will easily warp unless clamped.


Step 12:

Add molding in the front of each shelf, butting against the front of the dowels(not pictured).  Set the top piece back to be placed above the molding on the lower shelves.   I used 1/16 inch by 1/16 inch lumber I purchased at Hobby Lobby for this.  I also stained these molding pieces with the Minwax Golden Oak pen.


Step 13:

Prepare brackets, if you choose to use them.  I cast mine out of resin, using molds I made from Amazing Mold Putty.  Some of you will remember the clock my daughter had that I have used previously.  I used that same clock to cast these pieces.


Step 14:

Glue the brackets onto the shelves and hang them.  You are done!


Once I completed the above steps, I glued everything in, Wall, Sink and Plate Rack.  Time now to move on to the next project!

Until Next Time!

Doug S

P.S. Disclaimer:  I have not attempted to faithfully record exact dimensions.  I would expect that each situation would be different, and would require remeasuring. 

Wednesday, January 21, 2015

The Birth of A Miniature Steampunk Kitchen Sink

Greetings folks!

A couple of you guessed exactly what I was making as my next project! Thanks so much for playing my little game.  I hope you didn't mind too terribly much?

As you know, I had decided to make two kitchen sinks for my Steampunk Kitchens.  This is the second of those two sinks, the "clean" sink.  My little occupants, (the Lightstone family, I have decided finally, after the intended exterior of the house!) live in a very old and grand home that has been upgraded to keep up with the times.  They made a very good decision to keep their old stone sink and add the new fangled, iron sink. This just made sense, since they had the room, and everyone knows that sinks are useful commodities, right?


What the Lightstones DIDN'T realize when they had the sink ordered was that they didn't really have room in the Scullery for the new fangled sink. (Here is the coverup for my change of heart!)   They ended up putting the new sink into the butler's pantry, since after all, it was a MUCH nicer sink, therefore, it deserved a nicer location.  They did have to give up some storage space, and the Butler now has to join the other servants in the main kitchen, but he has accepted the slight as he enjoys his new sink.


Original Sink Shape and Size

The truth of the matter is that I just could not make the original (smaller) sink work in the space I had allocated for it in the Scullery, so as any good miniaturist will do, I changed my story!  I have to admit, I am still not sure I will use this in the Butler's pantry, but I am sure I will find a very good use for it somewhere, yes?

The sink is not quite complete yet, I am waiting on a couple of pieces on order from Hobby Supply, but I thought there was enough in this post to go ahead, and I'll share the final product in place in one of the next few posts.


The Camera Picks Out the Ugliest Little Details!
RL?  Not a one of them to be seen!

You WILL have to forgive my sad sack photography skills.  I took over 300 pictures of this sink in it's nearly completed state, and I just could not get a decent photo.  I guess it is the semi-gloss finish combined with the black color that made it so hard to capture.  So you'll have to imagine the inordinate beauty of the final product.  I have no way to show it to you!  :0)


In this post I'll share how this went from contact packaging,


and plastic packaging, 


to Steampunk Iron Sink.


Obviously, the process started with cutting everything to size.  I am sure your powers of deduction were sufficient to allow you to figure that out on your own, yes?  :0)


I then slid the cut down plastic into the "slots" that were already in the contact packaging and glued the pieces together.  This provided me a "form" to work with that would help me shape the sink.


I cut the sink counter surface pieces to shape out of 1/4 inch wood, and added the sides of the sink which I had cut out of 1/32" wide mahogany lumber. 


The entire assembly was glued together to create the basic shape.


The sides were reinforced with wood pieces, as the 1/32" wood would easily break over time otherwise.


The form for the backing was just cut from a piece of Mountboard and taped to the back and the plastic piece at the bottom to support the form while it was in work. 

Now for the fun part!  My FIRST experience with Polymer Clay.  This was Sculpey III.  It was easier (and harder!) than I would ever have imagined.   If you have never worked with Polymer Clays, they make it sound much harder than it is!  I went into this with my heart in my throat, SURE I was going to do something wrong (and of course I did!).  


The "conditioning" that they talk about is nothing more than kneading the clay like bread.  When it comes out of the package, it is literally almost like stone, fairly hard and not pliable.  "Conditioning" is just kneading the clay until it becomes soft and pliable.  So why did I have my heart in my throat?  I guess I just wanted something to chew on.   Once the clay was conditioned, I rolled it out into flat pieces about 1/8" thick.


I covered the entire form with Polymer Clay a piece at a time.   Here, in hind sight, I left things too unfinished.  Note the somewhat bumpy surfaces I was left with?  Doing this again, I would spend more time on smoothing out those places, as they fire up in just about exactly the same shape, no real movement of the clay while being baked.  Little details that make a difference in the long run!


The clay formed piece was baked in the oven at 275 degrees for 25 minutes.  I kept peeking at the thing the whole way through because I was afraid I was going to burn it!


Prior to baking the polymer, I had tried to make impressions along the front of the sink, to create a pattern across the sink sides.   That was NOT successful.  I have more to learn, yea!  :0)  Because of that, and because of my lack of attention to detail on preparing the surfaces before baking, I needed to sand the surfaces smoother.  I was able to do that for the most part successfully, but the piece still has some "inelegant" lines due to my learning curve.


My next step was to add some additional details to create additional interest for the sink.  Above pictured is the beginning of that process.  The additional polymer shapes were added on top of the already baked sink form.  Here I have added an architectural detail at the back and am in the process of adding a lip along the sink front. 


This process was accomplished by rolling the clay into small ropes, and applying them along the area I was adding detail, and then sculpting them into shape with various polymer clay tools.


Here I am shaping the lip along the front of the sink.  This is a totally staged picture!  I am right handed, I would never be able to manage shaping anything using my left hand.  But we must  have pictures to communicate, yes? 

Once the addition of new details was completed, I again baked the piece to harden the clay. 


The entire piece was painted black using a semi-gloss spray. 


The little details that were added were all resin castings I made.  The linear details are half casts of dollhouse furniture legs, and the other two details are castings of findings I had in my stash.  This picture is an example of the ugliness I was getting with most of my pictures.  Every little jot and tittle, every errant brush stroke, and every imperfection stands out in all its gory detail.  I swear, it looks SO  much nicer in Real Life.  :0) 


There is more to do before this sink will be done.  I will add legs to the piece, and will be adding the faucets and other details that finalize it into a full fledged sink, but the legs are on order, and the faucets, I haven't yet decided whether I want to make or purchase.  I figured this post was long enough without making you wait longer and adding even more text to wade through!

Well, I am late getting started for work, because I am finishing this up.  So I better hang a close on the post and get on the stick!

Hope you all have a great day!

Doug