More Pages

Showing posts with label Creative Process. Show all posts

Friday, July 3, 2015

Window Drama
Channeling Victor Horta


Entry with New Windows


One of my favorite Art Nouveau Architects is a Belgian named Victor Horta.  He was born in 1861 and died in 1947.   One of his primary beliefs was that an entire space should be designed as one entity, that every small part of a design should contribute to a whole.


Baron Victor Horta - Belgian architect and designer

His work is truly magnificent, and in every building he designed you can trace this philosophy within the final result.


Every line complements every other part of the design, nothing is left to chance.   Lines flow into one another, shapes work together to create a memorable effect, and colors harmonize into an outcome that leaves one fully enchanted.  Every portion of the design, in some way, seems to be drawn directly from Nature itself. 


Exterior View of Manor Facade Windows

I wanted the facade of my Manor to capture a bit of this feeling, to send ones mind back to nature, to contribute to a whole that feels a part of nature.  Steampunk, in particular, often draws on this aesthetic to create environs that feel exotic and exciting.

Steampunk incorporates elements from many sources, a bit of fantasy and a bit of every artistic style imaginable.  It is heavily informed by historical design, particularly during the Victorian era. The elegance and studied beauty of the Art Nouveau Style is a favorite element in many representations of the Steampunk genre. 

Closeup of the Entry Window
One of the hallmarks of the Art Nouveau style, and of Victor Horta's work, is its asymmetrical lines and it's use of undulating lines that harken directly back to nature.  The myriad forms of flower stalks, insect wings, vine tendrils and sapling branches are deeply embedded into the design style. 

I chose to try and emulate the tendrils of vines to complement the colors I wanted to use, and to harmonize with  the deep browns and blues of the interior of the entry.  I felt like they went well together, and were in the spirit of the "designed whole" that Victor Horta displayed.  


Birds Eye view of the Manor Entry Grand Staircase

The shapes of the stairway, the door, and the almost water like appearance of the poured resin floor seemed to create a whole that I particularly liked.  I felt like this window treatment is solidly in the spirit of both Steampunk, and of the Art Nouveau style I so admire. I feel like it echoes the spirit of the Entry so far. 


In the photo of the Tassel House Stairway designed by Victor Horta, you can see the ghost of some of the choices I've made in my own Entry Stairway.  This is one of my favorite pictures of Victor Horta's work.  While the actual lines of the staircase above are somewhat different, the general effect of the final stair will be very similar, if I have my way!


Above is a photo of Victor Horta's studio, which now has been converted into a museum.  You can see the same curves and vine-like shapes in use in this example of his work.  I wanted this same sense of natural movement to inform my windows. The result of this desire is the window set I created for the facade of the Manor.


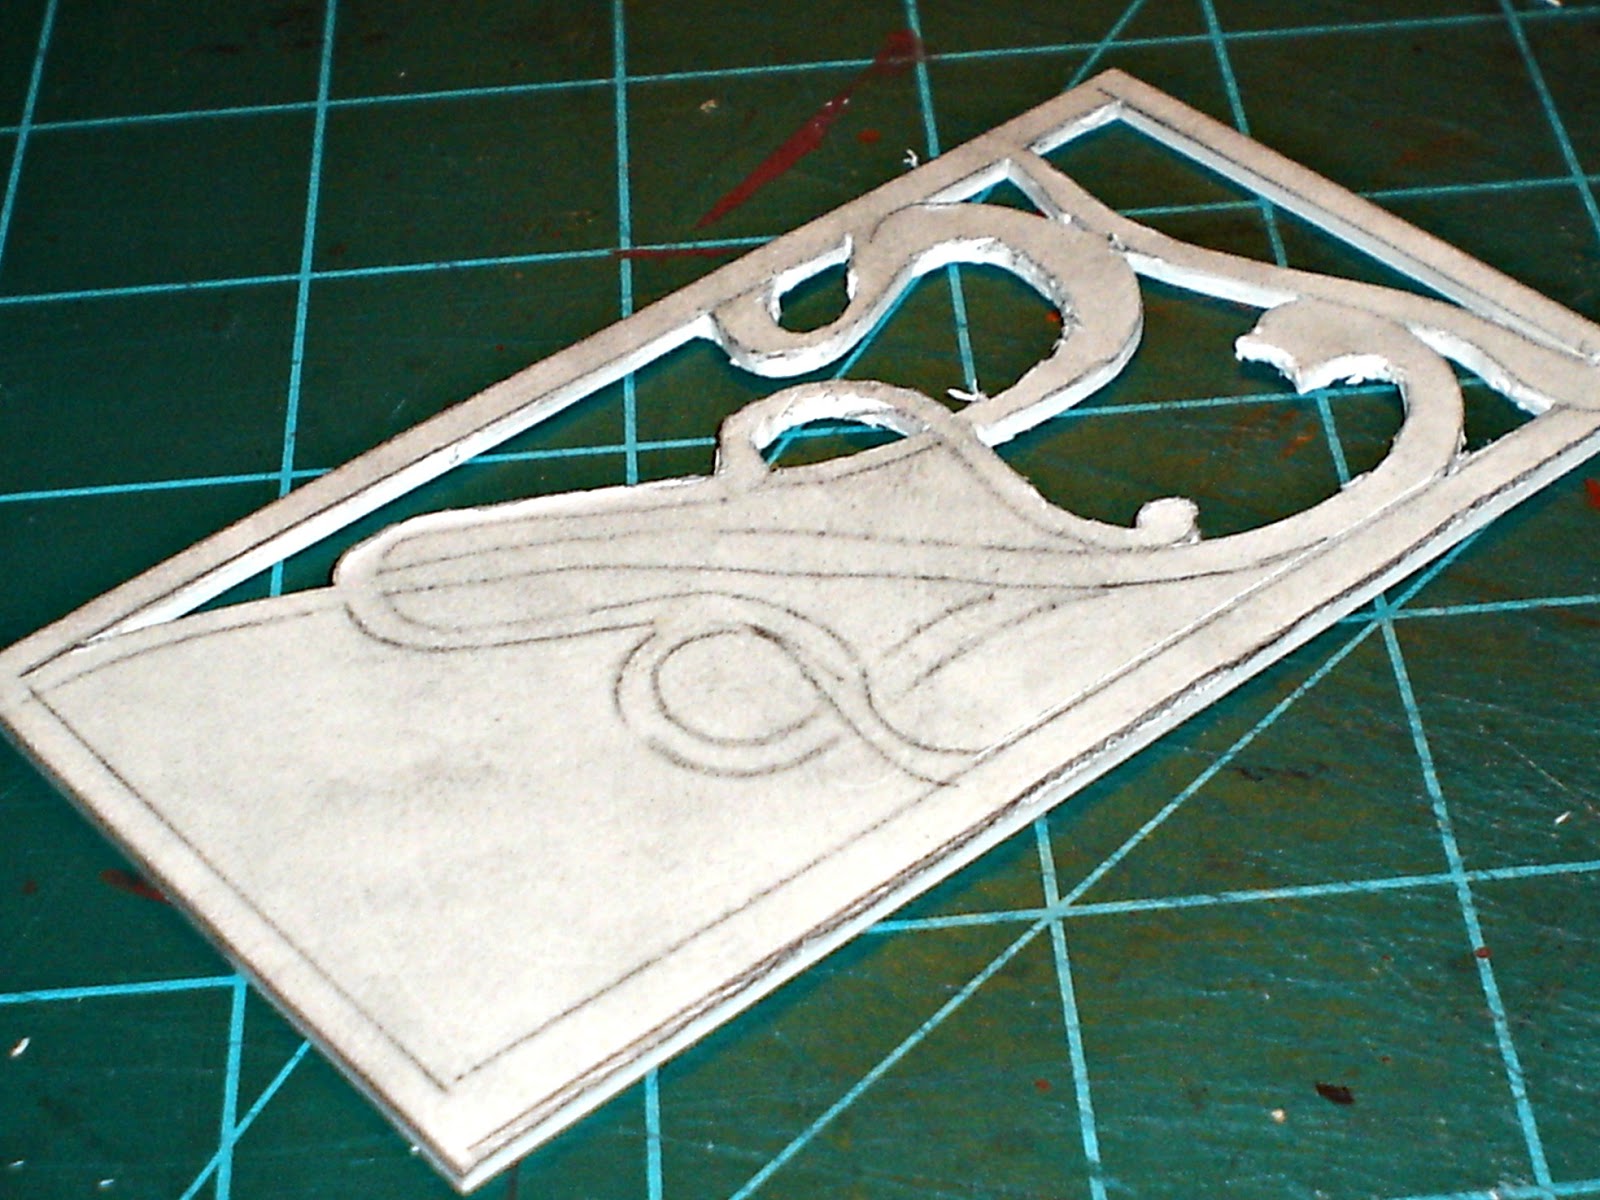
Foam Core Mockup In Progress


I began as I usually do with a mockup of my potential windows.  This was fashioned from Foam Core board.  I used a photo of a firescreen that I loved to help me determine the right lines, traced it onto Tracing Paper, and transferred it onto the Foam Core.  To transfer from Tracing Paper to the Foam Core I used the process of using a soft graphite pencil to scribble along all the lines of the tracing on the side I wanted to use.  Then I placed the tracing, scribble side down, on the Foam Core, and then retraced all the lines.  This left a clear imprint of the pattern on the Foam Core.  


Using the Scroll Saw to Cut the Windows

I then transferred the same pattern, once I had decided I liked the design, to two 1/32" pieces of wood.  I taped those together to try and cut the exact same pattern on both windows. 


Woeful results of the wood cutting process.  

Unfortunately, this did not work too well. Above is what I ended up with.  A lot of work went into those two sad pieces of wood.  Time to go back to the drawing board. 


Suddenly, I decided my mockup versions looked just fine.  We'll see whether that decision sticks.  I am not done with the windows yet, as I intend to add a bit more depth to them, so we'll see.  I may try a different thickness of wood and redo the windows with that, but for the moment, my plan is to see where this version takes me, and if I like it, it will become the final!  See how that works?


I painted the Foam Core board a bronze color that I thought harmonized well with the floors and the gold leaf above the door on the inside.  I am very happy with the results so far.  While they do still look a little rough to me, I know that the work I plan to do on them should remove that roughness.  

Now on to the door...  getting the basic shape of that right will be my next task.  I actually already have that shape designed, but the door is not yet built so we'll all have to wait for the final result!


The Rejected Door Design - the New One is much better!

I did do a mockup of "the door", but this one has been rejected.  I'll share it with you here, just because it really ought to see the light of day somewhere!  It's cool, but just not right for the manor. This is why we do mockups!  :0) 

Hope you all enjoyed seeing the work of Victor Horta.  He is truly my architectural hero...Everything he did appeals to me.  Maybe its the curves...maybe the colors, maybe the truly designed total environments, but something about his work speaks to me like no one elses!

Until next time!  I hope you all are enjoying your summer!

Doug S

Saturday, June 20, 2015

Bits and Pieces

Hello folks!  I sure hope you all are getting some of the BEAUTIFUL weather we are having  here in the Puget Sound!  We've got sun.  We've got summer breezes. We've got 70 + degree F weather! Who could ask for more!

There is nothing more beautiful than Seattle in the Sun.  "The Bluest Skies You've Ever Seen Are in Seattle"!  

Needless to say, I'm working only a few minutes at a time nowadays!   But I am making progress, day by day, and am finally beginning to visualize the next phase of my project and working out the bugs.  Today though, I give you bits and pieces...!   I am in the process of trying to create an interesting and Steampunk - eee facade for the Manor.  

I've had these two pics set aside for some time.  Since the underpinnings of what I am working on are a bit mundane, I thought I would give you glimpses of things to come in order to whet your appetite and so that you won't think that I've dropped off the face of the earth!


First, a wonderful 3D Graphics painting from the Internet created by Jim Fiscus. This digital image spoke to me the moment I saw it, and I knew that it was going to inform part of what I did on the facade.  It is an exciting and interesting image, and provides a number of ideas I will rework and include in my facade.


Here is another photo I love.  This is actually of a window, also found on the Internet,  This beautifully imposing set of doors captures the ornate sense of drama that I wanted for the Entrance Door for the Manor.

I do have several other photos I am using for reference, but these two are the two that are the forming the major inspiration for what I am doing with the Entrance.

Now for the bits and pieces!  These are some of the major ingredients that will go into the facade...but there are many more!  :0) 


An old plastic jewelry box

First, my daughters jewelry box.  She recently tried to give it to Charity,and I rescued it and put it in my stash.  I know.  Selfish.  But as you know, this has become a staple item for me!


An 8x10 Frame

A Picture Frame from Goodwill...  


A casting of a cabinet pull

A Cabinet Pull from Hobby Lobby... 


Isn't this gorgeous tile?  Metallic and all shades of brown and gold.

Enameled ceramic tile from Home Depot...  


You will not recognize this Glass Tile when I am done!

Glass tile from Lowe's Home Center...


Fell in Love...Steampunk...Yes? 

And a Jewelry finding of a Leopard's head from Hobby Lobby... 


The Mundane Part!

I've spent the last several weeks working my way through this.  You know how you get an idea...and  your mind "finds" the "right" thing over time...well, I have become a "finder".  But now I am getting very excited about the possibilities!


Concept drawing of a Steampunk Boiler

As a parting shot, let me also share with you another project that is "in work".   This is a Steampunk Boiler that I dreamed up.  This is also in the finding stage...I am sure the final product will be quite different, as concept drawings are nothing MORE than concepts, but I am a interested to see if I can carry this one off!  

Hope there is enough here to capture your imagination...Mine is going wild! 

Until next time.

Doug S

Tuesday, February 24, 2015

Sheer Determination?


The only way to find the limits of the possible 
is by going beyond them to the impossible.

Arthur C. Clarke


What a journey!  I've spent my last couple of weeks working on getting the kitchen doors designed and built. I probably have a couple more weeks to go to complete them.  But I thought I would share the progress so far, as for me, getting to this point has been quite an effort!

First, I have a very important list to share. 

My List of Nevers:

  1. I have never ever cut circles in wood with my new Proxxon Scroll Saw.
  2. I have never ever made anything resembling a door.
  3. I have never ever tried to work with tiny wood pieces smaller than my fingers.
  4. I have never ever tried to carve detail into wood.
  5. I have never ever tried to stain wood that I have carved. 
With that list of nevers, this project was a stretch!  However, I have arrived somewhere, and I have yet to determine if somewhere is where I want to be!  :0)   I feel good though, at having arrived somewhere.  

I am likely to redo these doors, using the many lessons I learned as I pursued the impossible.  But for a first go, I am actually reasonably happy with my results so far.  I say this with full knowledge that I am nowhere near done with the FIRST try.  I must be a masochist.  Yes, I am convinced I am a masochist.


The "Plan":


To explain myself, I need to show you what I am using as my inspiration picture.  Like usual, I go for gold, and have the talent to create dross, but that don't stop ME!  :0)

This door completely captured the feeling I wanted for the kitchen doors. It screams Steampunk to me, and I really love the scroll work in the windows and the black metal trim.   I knew going into this that I would not be able to completely recreate this masterpiece of a door, but I thought perhaps I could approximate the door, simplify it a bit, and get the basic concept in place.


With this inspiration in mind, I came up with a "concept" as seen above. There is SO much between a "concept" and "reality"!  You've seen that what I have so far is a long ways away from this even, and THIS is the dummied down version!

Curse my affinity for "unusual" and "artistic" expression.  Bah! Humbug!  I've had to continually simplify my design due to the limitations of my current abilities.  But I am still excited about the direction of the door, and know that with time, I will be able to create something that I think meets my standards and communicates a similar feeling.

You can see though, that I am FAR from complete with my little endeavor!


The "Reality":

I just wish I could communicate the comic events that have taken place to get me to this place in the process. I can think of no way to demonstrate the ups and downs without writing a TRUE novel, so I'll just give you an account of what I have done to get here, and let you fill in the blanks.


Almost immediately, I realized that I did not have "room" for all of my "unusual and artistic" concepts in the space I had left for the door in the kitchen room box.  After that rather disappointing realization, I "redesigned" the door slightly to allow me to keep the basic concept, while eliminating the problem of not having enough "canvas for my muse".  The basic change was to the window shape.  I narrowed the window space, turned it into four window lites leveraging the kitchen window design, and proceeded.


Even this simple change took me some time to figure out.  My original pattern (right) felt too "squished", with the top two windows looking out of proportion, especially when viewed in conjunction with the windows I had designed.  So I altered the pattern to make the top windows larger, and changed the shape of the lower windows slightly to give them more shape (left).  

Another side trip.  I spent 3 days at least on trying to figure out how to place the doors.  Which "direction" should the door jamb face?  Outward, or inward?  What IS the standard for that?  I found MANY articles on how to build a door frame and how to hang a door, but NONE of them told me how to decide which direction to face the door!  I think it is one of those details that those "in the know" assume "the rest" of us know.  Well, they were WRONG.  

I finally started looking at every door I could find, to determine what was "right".  I still don't know.  :0)  But I DID pick up on the fact that MOST exterior doors have the jamb facing inward, with the door opening inward.  So that is what I decided needed to happen.  Maybe someone out there can inform me whether I was right or not!  It would be nice to know!


After reaching this stage, I procrastinated for a few days.  (Actually, life caught up with me, and I've spent a good portion of my time dealing with "stuff" I won't bore you with! . . . but I ALSO was procrastinating!)  I knew I wanted the curved, carved profile at the bottom of the door, and that I wanted to stain the wood to create that warm, aged glow in the original inspiration picture, but I was just not sure how to go about it.

Sometimes, you just have to jump in the lake and hope you learn to swim.  So I traced my pattern on 3/32" lumber, and then tried to figure out how I would cut the windows in.  I had a jigsaw, a scroll saw, a fret saw and a utility knife.  Each had their liabilities.  


I tried first with my new scroll saw.  Remind me sometime to tell you about that.  It involved figuring out how to change the (too long) saw blade with no decent instructions, and very little experience with a scroll saw that was more than a toy.  Not pretty. 

I finally gave up on getting the the scroll saw set up, and tried a fret saw.  I broke the wood several times before I decided THAT wasn't the "correct" procedure.  Then I tried the craft knife.  That worked, but the curved edges were just not up to snuff, and I was unable to come up with a solution for that.  So I THOUGHT about the hand held jigsaw, but since I am such a smart cookie, I remembered my LAST encounter with that on small cuts. Rejected out of hand.  No way that was going to work.  So back to Square One.  The new scroll saw, which by this time I had already learned to hate!  


I knew the first step was to drill holes, which I did, and then I began to break things.  LOTS of things.  After many tries, many more broken scroll saw blades, and many more frustrations, I finally worked out a solution that actually worked.  But to do it, I had to perfect my skills at assembling and reassembling my Proxxon saw. 

I brought in the "big guns" to help me with that learning curve.  My very mechanical son.  Lo and behold, even he had trouble with the saw!  Yea, it wasn't me!  We perfected a method that worked (and definitely NOT the way the instructions identified!), and I proceeded to cut windows holes into the doors.  


Once I got all of the windows cut out, I tackled the carved "detail" (not so much!) at the bottom of the doors.  I began with a 1/8 inch thick piece of wood, cut to the general shape with the scroll saw.  I drew a circle to define where I wanted the "bulges" in the base trim to be. 

I then began to "carve" (something more like TEAR!) the wood out where I wanted the profile to be thinner. My first try was atrocious.  I am wise enough not to post that!  No one will ever come back if I do! 


This was my second try.  A bit better, but still too much "tearing out" going on.  It only "marginally" resembles the inspiration door.  But it was close enough that I thought perhaps it could be an "old" door, that had been damaged.  For the moment, we moved on. 


I used a golden oak stain to stain the wood, and carved my second door trim piece, which turned out rather better.  (minus the amateur look!)  After adding an acetate window, I ended up with this (yes, you've seen this before!


Then of course, we had to "check" to see if it was "going to look good".  Yes, it looks great we think.  Then we watch the beautiful tile fall over from its precariously balanced position directly onto my (BRAND NEW) expensive, specialty reading glasses. (Yes, I need them!)  Smashed to pieces.  Luckily, they were SO new that they were still under warranty, and my eye doc (did I tell you he is GREAT?) replaced them free of charge.  Whew!

So now you have heard only the SMALLEST bit of the trials and tribulations I have gone through in the last two weeks.  Do you feel sorry for me?  NO??!!  Why!  I think it is a great sob story!


Here are my halfway completed doors (propped, No, we did NOT learn our lesson) in their frames.  


The "Challenge":

My challenge going forward is to add the additional details to both the doors and windows that help to take them from their current, somewhat amateur state, to the Grand, Glorious, STEAM PUNK doors and Windows I envisioned.  Still a long ways to go!  I need to add black painted metal trims and add the metal art noveau details.   I MAY decide to do both doors over again, as mentioned before, so that I can improve the final look.  I would like to do a "better" job with the carving details, and I think I would like the wood color on the door to be a bit deeper.  Much depends on what things look like as I progress further.  

The whole process has been that peculiar blend of frustration and absolute FUN.  There is something about working through the "trials and tribulations" of working out problems and coming out "somewhere" on the other side that really floats my boat.  I have learned a boatload as well, so I have a "fully loaded floating boat".  How many of you can say that?  :0) 

I hope you have enjoyed seeing my many mini travails.  There is a book called "Hinds Feet in High Places" I read once that follows two characters (as well as the main character 'Much Afraid") named "Sorrow" and "Suffering".  After many tragic and horrible events endured with "Much Afraid" in tow, they finally arrive at the top of a mountain, where their names are changed to "Grace" and "Glory".  I hope that is my fate when it comes to these doors. I've certainly earned it!  :0) 

I also want to take a moment to welcome several new followers!  I'm excited to get to know you all, and your "patronage" is most appreciated.  I hope you will enjoy watching me learn, and I hope that my mini endeavors leave you a little wiser than I.

Until next time!

Doug S

Sunday, February 8, 2015

The Quest for Miniature Steampunk Windows


Decisions, Decisions, Decisions.

I've spent the last week dithering, trying to make the decision about what I wanted to do with the windows for the front of the Ground Floor of the Manor.  And figuring out how a window should look.  And trying to figure out how to build a window.  And questioning everything I did.  And taking a thousand [mostly unsuccessful!] pictures.  Sound familiar to anyone?


Needless to say, I am somewhat relieved to have arrived at the point that I have some progress to share.  I was able to finally make the decision as to what I wanted, but of course, it's me, so that may very well change!

I thought I would post about the process of getting there, more from the spirit of confession than anything else!  But perhaps there are a few things that can be picked up in the process.


As usual, I had a pretty good idea of the effect I wanted to create, but was not sure how I would get there.  I am drawing heavily on the Art Nouveau aesthetic throughout the design of this manor, and I knew I wanted the windows to align with that look but to still, more importantly, support the Steam Punk theme. 

So I drew out a rectangle that represented the size of the window, and drew in a pattern that I thought approximated what I wanted.  


I drew the pattern only on one half of the drawing, since I wanted the two sides to match exactly.  One trick I have learned over the years is to draw one half of the final design, and to fold the paper evenly in half.

Once drawn and folded, the paper can be cut to the new design.  This provides two exact, and reverse replicas of the design.  


I used the cut pattern to trace the new design onto mountboard.  Please forgive the quality of these pictures! I think they are the worst set of pictures so far, and I am not sure if it is me, or if my camera is just dying. They will have to do though, since several tries have not produced better. 


After cutting the new pattern out of the mount board, I cut rigid acetate at the same size, and added the "frame" out of Foam Core Board as a mock up.  I reviewed my results inside and outside, and for me, they just fell short of what I was going for.  

So back to the drawing board!


Meanwhile, I did decide to take a bit of a side trip, and build the frames I needed for each of the 4 windows I needed that were this size.  I used 3/8 inch strip wood for the outside frame, and 1/8 inch battens for the inside. 

A little trick I picked up off of the Internet I think is worth sharing here.  You will notice above that there is a Foam Core "frame" around the frame in the above picture.  These are 3/8 inch wide lengths of Foam Core measured to fall just outside of the required frame size and glued to a Foam Core background.  I used this "jig" to ensure that all of my windows were exactly the same size.  It worked like a charm!  I always like to pass along those little secrets.  They make life so much easier! 


Here you see the original design I came up with placed in the wood frame.  I thought perhaps I might like it better with a "real" frame, but no cigar.  It still didn't meet my "exacting" standards.  :0) 


So we began the process of altering the plan.  First I tried taking out the center post, opening up the entire window to increase the ability to see through it, and to try another approach to getting "the look".  

Nope.  Still didn't speak to me.  


Third time is a charm, right?  I tried again, using another approach that was a blend of the two above.  I opened the center of the window up, but added two muntins to either side of the window. 

Better, but still no cigar.  


I was playing with the pieces, trying to figure out what to do next, and happened to place one of the cutouts over another, and lo and behold . . .  "THE LOOK".  It spoke to me.  Steam Punk.  Victorian.  Art Nouveau.  THE LOOK.


Yep.  It worked in the windows too.  Other than the fact that when I cut the window openings out months ago, I didn't get them level or straight, either one.  So I corrected that, which of course, leaves a gap to fix later.   But they are now straight and level!  So I can jimmy up something to "fix" the problem later. Enough covering up, and anything can look great, right?


I'm a long ways from completed on these windows, in fact, they are extremely rough at the moment.  I had to re-cut the window openings (and will have to for all four!) because I was just 1/32 of an inch too large for the existing window openings.  Sigh.  

More opportunities, right?  

Overall, however, at this stage, I am quite pleased with the overall effect. Above is a shot of the Scullery, with the new window cutouts in place.  It totally gives me that Steam Punk vibe.   Cleaned up and finished, it will serve well, I think.  Still dithering around on what color I want the window frames to be, but that can wait a while.  My purpose so far has been to determine window sizes and shapes, so that I can move forward on the rest of the kitchen.  

As a blog follower, this has to be a bit frustrating, I am sure!  Always moving on before I finish!  I promise I'll come back and finish it all some day soon! 

I need to determine the basics of any portion of the kitchen that is toward the back, because I plan to enclose a portion of the kitchen soon.  So it was important to work with the windows to determine overall shape and size, so that I could settle other questions I need to work through. 


Here is the Butler's Pantry, with it's new window as well.  I really am pleased by the effect, though it is a bit harder to see, due to the black mount board contrasted with the ivory.  But that is just paint.  The shape works well with the interior, and will fully support the eventual look I am going for on the Exterior of the Manor.  More on that later!


It is exciting to start seeing the windows begin to go in because things start to feel more real!  Someday, after about 5 more years, this is gonna be cool!  :0)


By the way!  I am TOTALLY open to ideas on color for these windows.  I bounce between black, white, ivory, and brown mostly.  Above you see the "stone" that I plan to use on the exterior of the house.  In a mad moment of minor revelation, I will also share that the window boxes will be treated differently, [think metal] and that the windows must set into that backdrop perfectly.  Any suggestions?  :0)

Until next time!

Doug S