More Pages

Thursday, May 28, 2015

How To Window Decor
Steampunk Style!


Hello out there!  I hope you are all well, happy and occasionally working on your projects! 

I've had a couple of long awaited days off from work, and have spent them relaxing and catching up on the Manor. We spent the Memorial Day weekend in Sequim, Washington (pronounced Squim), after first visiting my Mother on Saturday, so we've been doing a bit of traveling.  We had some good eats and some incredibly relaxing family time,   We've had beautiful weather, and all is well with the world.  I am sure you wanted to know all that!


Today I wanted to share with you how I went about creating the new facade decorations below the kitchen and grand parlor windows!  This bit of work was a lot of fun, and I can see that the techniques used are applicable to many different projects, so I thought I would share them with you tutorial style!


Carving the Wood Base


You will need straight, close grained wood to carve from.  I used Balsa Wood (it's soft and cuts like butter!) that was 3/8 inch wide.  My local craft store didn't carry 3/8 inch balsa or basswood, so I glued together two 3/16" pieces to create the 3/8 inch width I wanted.


The red and black "clamps" are Closet Spacers I bought from an Estate Sale!  They worked beautifully for this application. 


The curves for the window base were drawn using a French Curve so that I could easily create a "flowing" curve that was pleasing.  After establishing the curve on one side, I used tracing paper folded over in the center to trace the other side, so that both curves were very similar, if not the same.


For my project, I had to carve four nearly identical profiles on the front, so that the finished pieces look the same.  To facilitate that, I established lines to use as a gauge to help me ensure that I was carving the same basic thicknesses and shapes at each measuring point.  I transferred each line I established on the first piece to each of the other pieces using a ruler and extending it across to the new piece.  I then used a pencil and a measuring caliper to establish points in a curve that were identical at each line on each piece.


Before carving out the unwanted material with a gouge, I used a chisel to create a Stop Line wherever I did not want the wood to split out.  For this piece, I created a stop line at the top and the bottom, to protect the "sill" and the "foundation piece".  You can see the piece carved to the stop line at the top of the photo below, and the stop line(s) at the bottom of the photo as well.  These aid in getting a straight cut across the piece.


Then using the gouge, I removed the unwanted wood down to the lines I had drawn on both ends of each piece.  Finally, using the chisel once more, I smoothed the basic carving surfaces and sanded out the gouge and chisel marks, to create a smooth finish.


I was placing a medallion in the center of the carved pieces, so I needed to create a flatter area in the center of the carved piece.  Again, the stop cut comes into play.  I used a stop cut to trace the shape of the medallion I was going to use, and then carved out the center to create a flat area to hold the medallion.

I used the same stain as I have used on the doors and windows already completed (Gunstock by Minwax) to stain the well sanded piece, and the carving step was completed.


Adding Steampunk Details

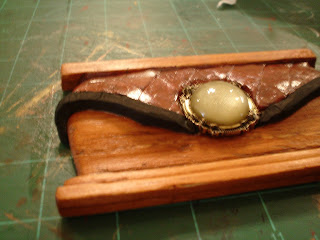
Now it was time to add the details that help to establish this window base as Steampunk.  To do this, I chose to use polymer clay to create brick colored tile for the window.


I cut a template from card, and then traced around the template with my knife to ensure that my shapes were the same.  I also traced around the medallion to establish the shape into which it would fit, and cut that out of each piece.


I used a knife to create the effect of tiles by cutting through the clay on diagonal lines. 


I used four colors of acrylic paint to create the textural depth of the brick.  The base was Brick Red, the next coat was a powder blue, the third a coat of Burnt Sienna, and the fourth a coat of "Burnt Sugar" (a golden brown color).  All coats except the first were applied and then  wiped off, leaving only traces of each color to create depth.  I then added more brick red to a gloss varnish to deepen the colors just a bit more.  The entire surface was then coated with a clear glossy varnish.


The last step was to add the "black stone" details, which I did again with polymer, this time painted black and coated with a matte finish.  


You'll probably note that all through the tutorial, I have had the base "upside down"....actually this was a "fortuitous" discovery.  When I had completed the piece, I turned it over to do something to it, and realized I liked it MUCH better "upside down"... so the "upside" is the "bottom-side" in the picture above...or what is now TOPSIDE.   :0)  I thought it looked even more steamy this way...and I think you will agree, it looks rather sporty on the facade of the Steampunk Manor. 


That's all for tonight folks!  I hope you enjoyed the "tutorial" such as it is, and that someone will find portions of it useful for their own projects.   I again have to apologize for the quality of some of these photos.  I have much to learn, it appears, about more than just minis...!

Until next time!

Doug S

Friday, May 22, 2015

Steam Punk [Art Nouveau?] Window Progress


Hi folks!  I hope this finds you all well and happy!

It's been a day or two (try nearly two weeks!) since I posted, and what I have to show you today is what has been done in 15 - 20 minutes a day over the last several weeks.  Life is incredibly full nowadays and what little time I think I have, I often don't feel quite up to the thinking!  But some small Progress we have, and so Progress we shall report.


The "finished" Grand parlor Windows


I left you with the basic wood shapes cut and formed for the Grand Parlor Windows.  My efforts have been focused on both the Window Box itself and finishing up the Windows themselves.  I have not installed them permanently, and won't until more has been done inside, but they are as far as they are going to go for now.  I will not be finishing up the trims and covering the base windows until much later in the build.


The unfinished Steam Punk Windows, for comparison!

I will tell you, from the point above, to where I am now on these has again been quite a journey!   My muse left me on a somewhat regular basis!  Silly muse...cannot keep him on task.

These windows are actually quite complex...with many steps.  I have been working on them well over a month by now.  I watch all of you put whole rooms together in a month, and I somethings am "moved to despair" thinking I will never finish!   I tend to "look", "stare", "mope" and "emote" my way to a final design for each step..  The whole process leaves me feeling like mush!  I don't know how you all do it!


"Tuxedo" Windows!


Anyhow, my first steps were of course to sand, paint and stain the windows.  I used a black acrylic on the outer trims, and a beautifully red tinted wood stain from Min-Wax named Gunstock.  I loved the effect, it created a "Tuxedo" effect that I find enchanting.  I added the Wire Details, using 4 rods this time rather than three, since the windows are larger, and I wanted to "fill" the space visually.


I then glued the mount board pieces I used to box the window together and Spackled the edges, painting the box ends again, until I had a reasonably smooth, well covered surface, and added a layer of satin varnish to give the boxes a "metallic" sheen.


Cast Resin Detail

I cast the resin "wrought iron details" to match the kitchen doors and pull the two ends together from a design perspective.  I purposely worked to "relate" the two ends, without duplicating the details slavishly, as I think that is one of the keys to creating interest...everything "goes together" but there is always something new around the next corner.

(Please forgive all the steel wool dust!  Arghhh!  I have so much to learn about Photography!)


Hobby Lobby find!  Fairy Tales line by beadtreasures


The last steps were to coat the entire thing with the same satin varnish I used on the end boxes, and to add a bit of detail to the base.  The metal "shield" on the base is simply a charm from the "Fairy Tales" line sold by bead treasures.  I just cut off the top using my jeweler's pliers, and glued it straight on to the wood, as is.  I like the "pop" of the metal against the warm wood colors and accented by the black.  

Those "empty spaces" below the window are very tempting...  So many possibilities!


I am especially excited about the interior view, which at the moment,doesn't look like all that much, but will be gussied up as part of the interior trim work.  That is much farther down the line...so we'll just have to be patient.


The Completed "Steam Punk" Window...why does it look so Nouveau? 


For the moment, these Grand Parlor windows are as far as they will go.  I'll be adding additional trim to the outside while working on the interior trims, so a truly "finished" window is a few weeks away at best!

My next steps will be to move around to the front of the Manor, and add similar related details to the base of the windows along the front.  I say "similar" but never forget...nothing happens the same way twice when I am building things!  Who knows what extraordinary things are yet to come?  (I'll tell you a well known secret. . . even I don't know!  :0)

I'd like to welcome a few new followers on board!  I am excited to share this journey with you, and to learn from you too!

Until next time!

Doug S

Sunday, May 3, 2015

The Language of the Eyes - Window Box Progress

Hi folks,

Something about a window speaks volumes about what is inside a house.  Like our eyes, they display our secrets, telling the world about how we live, who we are, and what we love.

My Grand Parlor windows are still in progress, I think now I have spent close to 30 hours working through this window set! The gestation period for these ideas was much longer than most!  But, halfway through, I am seeing the spirit of the house come alive, as I add more and more details around the box windows.  It is an exciting and rewarding period in the construction of this Chateau.


But what secrets lie behind these eyes, do you suppose?   

Secrets of Love?

Stories of Horror and Destruction?

Maybe just the work of a very odd artist?  


Whatever secrets are buried within the depths of the Chateau, I am sure they will come out one day. Secrets have a way of wiggling themselves into the Light.


My first secret is that I have discovered the difference between an artist and a craftsman!   I have been reading my "new" old library book, 'The Secrets of the Doll House Makers' that I got off of Amazon for only 11 dollars!  (This book has been priced over one hundred dollars when I have looked before)

Since I began building the Chateau in January of 2014, I have felt secretly guilty, since I have not "drawn out a plan".  I kept reasoning with myself that a "reasonable man" would draw everything out, have every duck in a row, and everything generally "put together" before starting.

As I read through the well written articles about each of the mini masters of the past (and present!) I have learned about the way that each of them worked, and while MOST DO have detailed plans and spend hours and hours taking photographs and planning every move, there are SOME who operate just the way I do...and I feel oh so vindicated!  I share my building approach with Robert Stubbs of all people!   It's a relief to know I am not "wrong" in my approach!

It was very clear to me as I read through this book that we all approach our work so differently, yet most of us fall into one of two camps - the artist, or the craftsman.  I just happen to be the "artist" type.  Tall, good looking, and oh so romantic...ooops, that just slipped out.  Please forgive me!


However, this IS the reason that I struggle with many of my designs, each an idea that needs a (sometimes long!) gestation period before coming unbidden into the world.  But I know now, that I have the soul of an artist, responding to the moment of creativity, and to the muse within.  I am just not a craftsman!  :0)

I spent three or four days obsessing about the color to use on the end caps of the Chateau.  I loved the color of the Chestnut Brown on the front windows, but I did not want to carry that clear around the house, as I thought that would be too much of a good thing!  I finally settled on a brick red color, and once I had it on the Chateau, it really spoke to me!  It's all "Steampunk and Victoriana" like, and that pleases me.


As with everything at this stage of the game, none of this is anywhere near complete, but the brick red and chestnut brown will make a wonderful backdrop for the architectural and decorative trims yet to come.

I chose to close in the windows just a bit, and provide some additional detail, which I think has worked out wonderfully.  I would have liked a fully open window, but I knew I wanted to carry the theme from the kitchen doors across to the other end of the house, and as I cogitated, stared, and cursed over the window design, it finally came to me that this treatment would meet my needs, and would add an additional element of interest to the windows both inside and out.


In the inner sanctum - a view of the new window from inside.  Still has the sticker on it!  :0) 


I love the effect created by the additional wall space added under the window.  It cries out for some fancy molding and trims, and provides me with a wonderful opportunity!  My wife is a talented painter, and she has agreed to paint this area with small murals, and I am stoked.  I have "dreams a dancin' in my head".

The Bones of the Window Insert

The windows are made, so far, of 5 parts.  You can see above the four panels that make up the wood portion of the windows, along with the small acetate piece that goes into the squared off opening. 


Inner Window with Sandwiched 1/32 inch basswood and acetate window

Each "nouveau" window cut out is 3/32" basswood, while the narrower slice that holds the acetate and the nouveau trim piece on the outer window are of 1/32 inch basswood.  The pieces are stacked one upon another to create the thickness of the window.


Stacked Window pieces


The Outer Window surface was added over the top of the two pieces pictured above, and then Art Nouveau inspired trim was cut using a craft knife, and added to the outer surface for trim


Window Trim


To this trim will later be added some additional decorative trimmings and architectural details, that echo and morph the effects on the kitchen doors. The empty spaces on the window base will include some of this trim. 

Glued up stock, ready for carving

To build up the trim below the windows, I used a very similar process to the process I used to create the doors, though since these were much larger pieces to carve, I glued up several pieces of varying heights which helped to set the basic profiles before carving, and allowed for less wasted wood.


Carved and Sanded Panels 
The decorative panel below the windows has a slightly modified profile, as I wanted the panel to line up along the base of the window well.   As with the doors, I sanded out the shape I wanted using a progression of sandpaper and steel wool, 


Kitchen Doors with Brick Red Surround


My next tasks are to complete the windows by adding the metal decorative rods, staining the doors, and adding the decorative trims to further imitate the kitchen doors.  Once I've completed that much, I'll be moving on to the exterior Entry Door and Windows, and then I will be working inside the Chateau again, and will resume work on the trims. 

I look forward to the day when I can batten down the hatches and glue everything together.  That, however, may be a while in coming!  It is a good thing I enjoy the creative process, because I spend about 80 percent of my time thinking and about 20 percent actually building anything!  But that is the progress on the Chateau since my last post, 

I wish you all the best, every one of you!  I enjoy your comments, and treasure every one of you who take the time to give me your thoughts and impressions!  I look forward to revealing future secrets and look forward to that someday when the story of the Steampunk Chateau will be fully expressed!

Until Next Time!

Doug S