More Pages

Showing posts with label General. Show all posts

Monday, March 2, 2015

A Unique Opportunity (Deja Vu)


Hi there folks!

Anyone need a new miniature house project?!!  I just stumbled across something this morning that I thought might be of interest to some of you, and thought I would post it.

Then I thought I would not post it, and deleted the post for multiple reasons I won't go into. But in the whole hour it remained on line, a couple of you found it, and asked me about it.  So I thought again, and am re-posting it per request!  :0)

I do think it is a unique opportunity, and goes for a cause I'd love to support, so here we go again!  Thus you may be experiencing "Deja Vu".


Screen Shot 2015-02-28 at 02.11.17.png
Image credits:

CHÂTEAU DE GUDANES


I thought a couple of you might be looking for a new project, and perhaps a couple more just need a few more future projects!  This looked intriguing to me, and I thought that it would be neat to see what someone might do with it!  

The doll house is in a pre-order state and for those who are part of the first 100 to purchase,you can pick it up at the discounted rate of 65 US Dollars. For details regarding this offer (which I have no stake in!) see it at CHÂTEAU DE GUDANES.  There you will see the full story. 


Screen Shot 2015-02-28 at 02.13.01.png
Image credits:

CHÂTEAU DE GUDANES


While you are there, take a look around at the website.  It is an exciting restoration of a once abandoned French Chateau.  There are some wonderful photos on the site, and some history about the project and how the home came to be abandoned.

If nothing else, you will enjoy the history and photos!  Take a look if you are so inclined!

Thanks!

Doug S

Sunday, January 25, 2015

. . . But I Dream Things That Never Were, and Say Why Not?
George Bernard Shaw


Hi there folks! 

One year ago, on January 23rd,  I began the process of building the Steampunk Manor.  I spent some time today pulling out what I had done and getting it all set up just to see where I had landed so far.   My thought is that near the end of January every year, I will record progress with a post. 


A shot of the Grand Parlor . . . err . . .  our bedroom?  

Here is a shot of the Grand Parlor from the Exterior, and looking into our bedroom, where the house is stored when it is not being worked on.  Yes, those are my sweat pants laying on the bed.  No I did not really make my bed very well before taking the shot.  :0)   But I think the foreshortening makes for a very nice picture!


Grand Parlor

Here is the Grand Parlor shot in full.  Lots to do still!  I look forward to furnishing this room, and completing everything.  Nothing more so far than a few base colors!


Entry with Grand Staircase in progress

I have great plans for this Entry.  Nothing is complete in here, except the floor.  A LONG ways to go, but some exciting stuff to come, I think!


The Kitchen with a Surprise!

Just a bit of a reveal going on here!  Here is the Butlers Pantry, with a newly introduced item in work!  I'll post once I complete that, and share with you what it is. 


Exterior Shot

Here is the Exterior as it now stands.  Nothing too exciting going on quite yet.  But I think there is promise here. 


Interior Progress Shot

Interior with everything propped in and up.  :0)  Progress has mostly been toward ceilings, walls and floors for the ground floor to date. 


Closeup of the Oriel Windows

The Oriel Window on the Exterior in its partially completed state.   This is a feature I am excited about further developing.  It has so many possibilities!


Exterior from the side

I'm not sure you've seen the house from this angle before.  It may give you an idea of things to come!  I am excited for 2015, since by this time next year I should be well along on at least the ground floor!  2015 is the year that the Steampunk Manor turns a corner toward something "real". 

Something that never was before. Why Not?  :0) 

Its been a good year!  I have learned how to work with Foam Core Board, how to paint with Floating Medium, How to Carve, How to Work with Polymer Clay, and How to Inlay a Floor.  I have built 4 staircases, and three floors, built two sinks and gotten 3 ceilings started.  Oh, and built the the base for the house!  

Most importantly, I have made several new friends, whom I am enjoying building relationships with.  

Thank You to all of you who have contributed to my mini life so far!  It has been a wonderful experience!

Until next time!

Doug S

Thursday, October 9, 2014

Amazing Steampunk Clock!

I know...two posts in one day...how WILL you ever keep up?

However, I HAD to show you something I stumbled across recently...It is too cool.

Since I am building a Steampunk themed miniature house, I have, of course, been following several blogs, pintrest accounts, and Google accounts which are Steampunk themed...no better place for inspiration than what others are already doing!

This came across on one of those streams...and it is something I want to share.  This incredibly amazing work just has to be shared!

Enjoy a couple of videos here which show the astronomical clock that Mark Frank has been working on since 2004!  You are in for a real treat!


Hope you enjoyed this! After all, it is "miniature" after a fashion, and I am totally floored by the craftsmanship this would take! Be back soon!

Doug S

Thursday, August 14, 2014

A Good Traveler

I've said before that I make plans but I don't plan....I thought that in the context of this post, it might be prudent to explain myself!  I am a planner from the word go....but the quote below is exactly the way I think of planning.


A good traveler has no fixed plans,
 and is not intent on arriving.


I have a vision, an end state, that I want to accomplish. However, I am very open about how I get there, what paths I take, and what methods will provide the best solution.  So I express my vision, make plans to get there, and change them when they serve the greater vision.


Image Courtesy of Wallpaper Trade


So my "vision" is all about the "feel" of this house...I want it to be elegant, have the Steampunk vibe, feel  aged, obtain that thing we call realism, and it must connect with those who are viewing it.  I have a floor plan, I have some thoughts about how to obtain the vibe that I want, and some exciting methods I want to try to get there.  And I have a LOT to learn!


The Travel Plan

Here is the plan, as it stands today!  The Chateau will have a total of 14 rooms...that is mansion sized isn't it?


First Floor Modules - Kitchens, Entry, and Grand Parlor


On the ground floor, to the left, is going to be the scullery and butlers pantry in the back and a kitchen in the front.  All three kitchen areas will be treated as an old fashioned 1870-1880 kitchen...of course with the "vibe" added.  You already know about the center module, which will be the entry.  The right module will be the grand parlor, and will have a floor at two different levels if I can pull that off.


Second Floor Modules, Morning Room, Dining Room, Hallway, and Couples Bedroom

Moving to the second floor, in the left module will be two rooms, a morning room and a dining room, each filling half of the module.  As you know already, the middle module will be the main hall, and the right module will be the main bedroom, to be outfitted for the Mr. and Mrs.

Third Floor plans - Left to Right - Bath, Bedroom, Library, Bedroom and Sitting Room

The third floor will contain a bath and bedroom in the left module and a library in the center module.  The right module on the third floor is intended to become a third bedroom, with a potential sitting room.   I have not absolutely decided on the sitting room...I had some other thoughts as well, but for now, it is being declared the sitting room.

Soon to become a mansard roof


The third floor exterior will be a mansard roof with a decorative base. Box windows as  you can see above, will be all along the face of the roof.

Just one more photo that may give you a sense of the general air I want to create within the project.


Some of the fabrics gathered for the manse

This is a shot of some of the fabrics I have gathered.  These came from Pacific Fabrics...a store dedicated entirely to a beautiful range of fabrics...these are their "Fat Packs" intended for quilting.  They will be used for both window dressing and furniture coverings...all yet to be fully defined.

I felt a little foolish while shopping for these fabrics...  As the only representative of the male gender present within the store, I did feel a bit like running like a scared deer, but I managed to keep an appropriate decorum in spite of it.

Lastly, I'll share just a couple of key ideas that are informing my work to date.

I plan to add to the roof, which will slope up to the third floor, and then slope at a shallower rise to create a U-shaped wall around a platform on the center module (overlapping onto both right and left modules).  This will be an outdoor pavilion on the roof...I mean these folks have it good!  I've not quite completed my thoughts about how that will come off, so this is the most likely element to change...but I think I can pull that off, and if I can, I think it will be an outstanding feature.

Another key thought I'll share is that I do plan to help these folks move in in style, and the entire final scene is going to be centered around a wedding party getting ready for their wedding events.   I have a number of fun ideas about how to bring that to fruition too, and I think there will be lots of opportunity for that "connection" I hope to create in the end.

Those of you who choose to ride along will follow me along the journey from the current state to what I hope will be a fun, light-hearted, yet very elegant scene.

This was fun to share...I hope you've enjoyed the glimpse into the future!

Have a great day!

Doug S

Monday, July 28, 2014

From Humble Roots

Greetings!

I always find it interesting to see how people go about the creative process... we are all so different, and nothing quite demonstrates that as much as how a person goes about creating.  I thought some folks might like to see how I went about putting together the original concept for my Steampunk Chateau project.

The project started out of sheer boredom!  For many years now, there has been little "outdoor" stimulation at our house...Our town home literally has no outside space in the sun.  I have a beautiful little shade garden in the back that is too cold to sit in most of the time!   So I am somewhat trapped indoors, and have been for several years.

Nicknamed Cold Storage - My only outdoor escape 


During one of my fits of boredom, I got to looking out on the web at some of the incredibly beautiful and creative miniature work done by others, and got a hankering to try my hand at a miniature project.

At the same time, I was playing around with a book of George Barber Designs, as I love the Victorian era architecture, and I fell in love with this plan.

George Barber House Plan


I decided right then and there that I would build a miniature house to keep me busy during my down time.  And this had to be it.

Nothing too grand, you know!  

I wanted to build in 1:12 scale, so I drew it all up, thinking I would turn this into my project, but once I got everything measured out... It was going to be 7 feet long! OK..so I am a bit of a dreamer...but even I got cold feet at that.

 Town homes...miniature houses 7 feet long...not a pretty picture!

This got me into a downsizing mode, needless to say.   As part of my downtime during the last few years of captivity, I had purchased a program called Chief Architect.  It is a wonderful architectural program, and I have spent too many hours "building" houses with it.  So I took to my trusty laptop, and decided to create my own floor plan.  

The floor plan I came up with is the one I am using to build this project with. 

My downsized house is somewhere in the neighborhood of 54 inches tall and 58 inches long, when complete.  We don't want the neighbors thinking we cannot build "The Big One"!

Now wait for it....

The final design....

The Cardboard Model - the beginning


See, I told you I "make plans" but don't "plan"!  This is as far as I got before I knew what I wanted to do...sort of!   I had decided on a "French Chateau".  Lovely isn't it!

I was SOOOOOO excited!


My prototype sat in our living room for nearly a month while I planned and schemed...by the end of that time it looked a little less prim and proper: 

The Abandoned "Tape Mansion"


Soon after this photo of the abandoned French Chateau, the lovely building was demolished.

Where did the steampunk come from you ask?  Well...I ALSO considered a smaller steampunk roombox, but earlier favored the larger French Chateau...Well, you can guess.  I kept thinking about that Steampunk I idea...I love Steampunk!  I couldn't get it out of my head, so I just decided my "French Chateau" would become a "Steampunk Chateau". 

That was the beginning of a boatload of fun!  I have truly enjoyed working through the process of building this structure so far.  I am excited to share the process with others now too! 

Until next time!

Doug S. 


Sunday, July 27, 2014

A New Beginning


Hello one and all!
Welcome to Miniature Endeavors!


Welcome to my learning curve!  I am newly into miniatures within the last year, and I am already hooked. Totally!

I hope to be able to share with you the many things I am learning, and to return some of what I have found on so many other fine miniature blogs which I have religiously followed since I began this project.  I have thoroughly enjoyed them, and learned so much from them.  I already feel like I know some of you.  I hope to get to know a lot more folks in this process.


I first began my journey in the mini world in January of this year.  My only previous experience was the obligatory dollhouse for my daughter, and I had fun with that, but never really completely finished it, and within a few years it went the way of all "REAL" toys.  Well loved and abused, I might say!

I'd like to introduce my current, and first, real project, the Steampunk Chateau.  I don't have a better name yet....The house hasn't informed me yet what its name is.  I just know that it is inspired by my love of architecture, steampunk, furniture and all things graceful.  The combination has led to the project you will be following if you choose to go along for the ride.


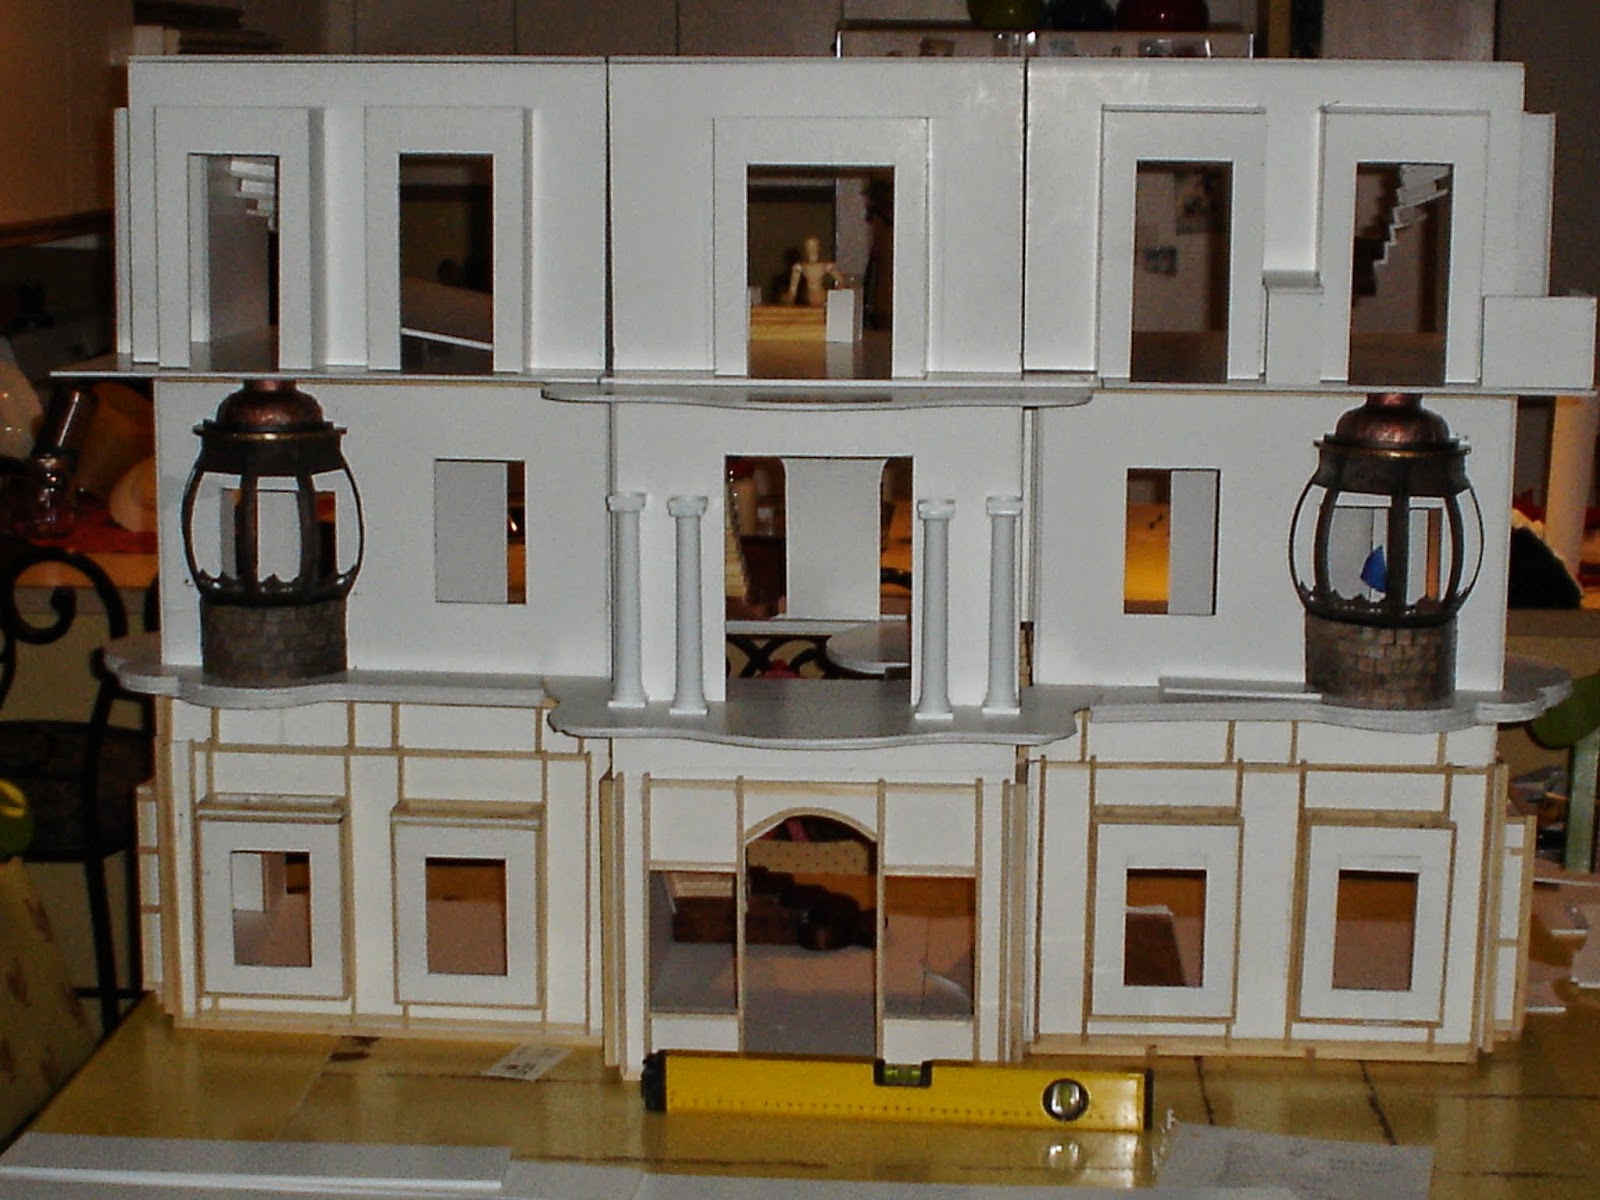
Scratch built room boxes assembled in dry fit - from the front


This is the view from the front on our dining room table.  I have built this structure entirely with foam core board and with wood sticks.  I chose to use this medium as I don't have much space!  I have built each of these room boxes separately, and will be joining them later in the build.  I live in a large town home with a SMALL living area...why DO they put all the space in the bedrooms?!

Here is a picture of the first of the room boxes at the very beginning of this process.   As you can see, I can work on one or two room boxes at a time, and don't have to have the entire contraption downstairs in our teeny, tiny living area.

Grand Parlor Room box, the first of many


I've scratch-built this house, as I did not want to be limited by what is available in the market. The process of designing the spaces, learning how to complete a task, and solving the problems that come with doing new things is what this is all about for me...so you'll see me try and fail, and occasionally succeed...but that is the way I like it.

If anybody has great ideas for what to name this monster, I am all ears!

Here is the view from the open back, as it currently stands (minus a few home improvements in the entry, which I will share later)  Everything in the house in this picture is propped and taped....except the basic room boxes, of which there are 9. Each of the six outside room boxes are 15.5 inches  x 16 inches, and the three center boxes are 13 in. x 19 in.  The whole is rather imposing!

Room boxes assembled in dry fit from the open back

My wife is overjoyed to watch my progress on the dining room table...I store the house in progress in our bedroom upstairs on a table, and I do the dirty work in the garage...the very SMALL garage.   Needless to say, I was looking for ways to minimize the impact of this project.  I suppose, now that I think about it, I could have chosen something SMALLER!  Nah...that would ruin everything!

I'll be posting my progress from January through today in amongst my current progress over the next few weeks... You'll get to see my process...I'll warn you...I "plan", but I don't "make plans".  Makes for an interesting journey!

Until next time, and I hope you will enjoy the read!