More Pages

Sunday, September 28, 2014

Steampunk Wood Floor Progress Continues


Hi there fellow mini makers!

I hope all is well in your miniature world!  (and of course in your rl world too!)

I've continued to work on the Steampunk wood floor, and I have to say, other than all those things I find to find fault with (and I am REALLY good at that!), I am ecstatic about how it is turning out.  I WANT it in my own house!   Do you think it is too dramatic for a two story townhouse?  :0)


I find it amazing what a camera does.  In this case, it ain't cool!  When you view this floor in real life, none of those "gaps" are evident at all.  This is a case when I would really LOVE to be able to "blur reality"!  Sigh. 

Up close and personal, it is still pretty rough...I have a lot to do to bring it to its final glory.  I will have to fill or disguise those imperfections...and I have a lot of sanding and aging to do to finalize the look, but I think it is an acceptable foundation for what I want to accomplish in the room. 


I am especially happy with the wood along the curved sides and the touch of "copper" on the stair...they help to translate the Steampunk feel when viewing the room from the front.  

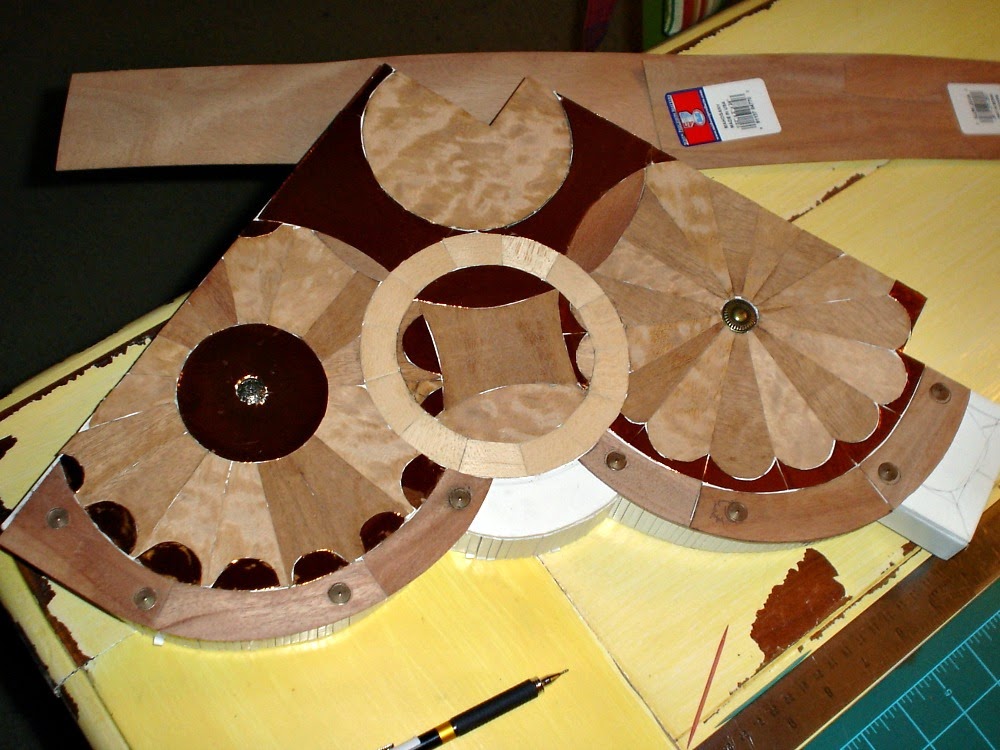
As you can see, I used a couple buttons from Hobby Lobby to fill in the centers of each circle, which finishes them off nicely.   I also added some findings to the edge detail.  This was a bit challenging to make happen, but I finally prevailed.  


Above you can see the easy part...:0)  I took the findings and cut off the end pieces in order to turn the findings into a circle.  I used a wire cutter to remove these. 


Please ignore all the embarrassing gaps!  They WILL be fixed!

I then drilled 3/8 in holes in the veneer pieces.  THIS was the challenge.  I used a paddle drill which was perfect....but if you have ever tried to drill into veneer...well...it ain't purty.  I went through so much wood...probably twice again what is in the edge pieces..because about half of the pieces broke in two around the paddle.  This necessitated re-cutting the pieces and trying again until I finally succeeded.  

In keeping with my goal of sharing the good, bad, and uglies of my process, I offer the following.  I am afraid I have MUCH to learn when it comes to "inlay".  I now appreciate those absolutely gorgeous inlaid jewelry boxes, art pieces, and floors so much more...  How DO they get things so precise?  It must take much more patience than I have hithertofore developed! 


A BAD case of Gaposis

It is a good thing I know how to disguise stuff.  :0)    When I am done, I promise..you will never know they were there. 

I'll close you off with a little glimpse of the future for this room.   I knew I wanted a piano up on the dais in the corner, and I found the perfect piano music box yesterday when I visited my mother.  I had forgotten she had it. She let me borrow it for a while. 


Alas..it is not mine to keep, so I must recreate it..but see how perfect?!!   I plan to adjust some of the details on the piano to go with my subtle underwater theme...but this is exactly what I had imagined, so it is great to find a model to work from.

With that, I will close off this post...and wish you all the best!  I'll continue to work on this floor and finish it up so that it has the atmosphere I am looking for...and meanwhile, in the back ground, I continue to work on the Grand Parlor ceiling.

Enjoy your day!

Doug S

Tuesday, September 23, 2014

Faux Painting a Water Texture


On the Ceiling?  


Well, yes...on the ceiling!  I mean Steampunk is unconventional, right?  So why not?  

My treatment for this room will overall be somewhat unconventional, I guess!  The "theme" of the room is intended to give the subtle impression that one might be underwater.  

Hence, the water texture on the ceiling.  See there IS a thought or two in my head...it is not ENTIRELY empty!

First, I must reveal that I am not "the painter" in the family.  My wife is an excellent painter, and can bring about pure magic when she wants to.  So I gave her the task of helping me figure out the ceiling.  I knew I wanted a water texture...but I  had no idea how to go about it.  

So I left a picture of the general feeling of what I wanted and waltzed off to work and forgot about it all. Here is the picture I provided. 


I came home to several options that she created.  There were actually 5 or 6 options!  How is that for delivering!  I just love having such a useful wife around.  (and I kind of like her a lot too!)

I chose one that I particularly liked as the beginning point.   Here is a picture of the one I liked best. 


This was a fun project!  All loosey goosey...and for me that is an unusual experience.  I personally don't think I am uptight, but there are those who have intimated such a thing!  

I will tell you that letting down and "playing" is NOT an easy task for me...perhaps that is why this hobby is such a great fit for me. 

At any rate, I had a lot of fun.  I'll lay down the process somewhat, though I forgot (of course!) to take a picture or two of parts of the process.  So you'll have to fill in gaps here and there!

The process started with a solid coat of turquoise green...a mixture between equal parts of white, and a Delta Ceramcoat acrylic called 'Christmas Green'. It turned out to be the exact color I was hoping for.  I wanted to come to a related color to the color of the paper I plan to convert into a floor. (pictured at the end of the post!)


I immediately followed that (after listening to the instructions from the lovely Vana White) with an "incomplete" coat of the same color with additional white acrylic added. 

This gave me a varied base coat that goes a long way toward creating the water look by itself. 


The next step was to lay out some new white paint, and add an extender to it.  I used the Floating Medium from Folk Art.


This is where I forgot to take pictures....SORRY!  But I think I can explain using the photo of the final version.


To create the variation, I used white paint and a very thin brush...finer than a pencil point.  I dipped the end of the brush in the white paint and drew lines and other patterns on the ceiling base color.  For the lines, the technique is to lightly hold the brush against the "canvas" and to twist the brush in your hands, not trying to control the outcome.  This was the loosey goosey part!  I had to let down and let it all go.  My tendency is to try and "order" everything...to create a pattern...but while SOME photos of water textures do demonstrate a pattern, that pattern is a very fluid pattern, and frankly, beyond MY ken!

So with gay abandon, I painted thin lines, big white spots, long lines, short lines, fat blobs, you name it...I did it.   The SECRET (as graciously shared by my beautiful wife) is the Floating Medium!  Once I finished playing with paint, (and at various times while painting) I used a CLEAN brush with Floating Medium (no paint in it) to go over the lines, blobs, et. al. here and there.  This blurred the lines to create a wonderful, truly water like effect!  

I finished up, and as I am prone to do, walked just far enough away to force myself to see things differently (i.e. not lines of paint, but a WATER TEXTURE).  :0)    I loved it!  I squealed, clapped and did the dance of joy!...(OK, minor exaggeration that...but I was happy!) 

Thanks to my wife, and her wonderful instructions, my Steampunk Chateau occupants will have a glorious textured ceiling...water texture that is!  May those tiny occupants enjoy that wonderful ceiling as much as I do! 

Hope the process (even without the pictures...duh!) was useful to see!

Until next time!

Doug S

Monday, September 22, 2014

Wood Floor Update

Hi folks,

Not much to say tonight, except Thank You to each of you for your wonderful comments and for your visits.  It is such a pleasure to me to know that the project is resonating with some folks.

I am all kinds of tired out tonight, so am not working on the miniatures today, but did quite a lot over the weekend, and thought I would just post a couple of photos of that for your viewing pleasure!


And another shot for good measure!


Still a ways to go but making good progress!  I am hoping to finish this up by the end of September...but we shall see!  No rush except that in my head!

Hope you all are well and having a good evening!

Doug 

Saturday, September 20, 2014

Wood Floor and More

Morning folks.  Welcome back!

Sharing progress so far on the Grand Parlor.  This room is getting me kind of excited!!  However, I also have a lot of frustration at my inability to "perfect" what I am doing. This house will have a lot of features brought about purely to cover up something!


As you know, I have been working on the ceilings and floors for the Grand Parlor.  As usual, I think my ideas outstrip my abilities...but I guess that is how I learn!


After adding my cookie tray to the ceiling to create a base for a carved ceiling, I had some trimming, spackling and sanding to do to create a smooth ceiling texture.   My first step was to use Gesso over the whole surface, which helps provide an adhering surface for the Spackle.   After Spackling the cookie tray, I sanded each groove to ensure a smooth surface. 


Above is a shot of the process in my "other" work space...the one I reserve for the dirty work.  I have a table in my garage where I sit to do this sort of work.  Now isn't it just COZY? 


Sorry for the side trip!  :0)  If you look closely (at the picture of the ceiling mind you), you can see that there are lines everywhere that I cut the cookie tray.  I spent quite a lot of time cleaning that up!  

The process was something like this...Gesso, Spackle, Wait, Sand....  Gesso, Spackle, Wait, Sand...  Gesso, Spackle, Wait, Sand....  you get the picture! However, creating a gesso base on this project was important, because I plan to paint the overall surface, and the cookie tray was a slick, non-porous surface, so without a base coat of  primer (Gesso in this case), I would not have been able to get the paint to stick. 

But it was worth the effort, because what I finally ended up with is this...


You can still see some of the lines in the shot above, but those will be covered up.  Each of the grooves is as smooth as silk!  (or will be after I sand the heck out of everything again!)  My "carved" ceiling will be brought to life with resin castings.  Did I tell you I just love resin?  

Not really...I just haven't really learned to carve yet, and am postponing that momentous event until I get some of the basics under my belt!  So for now, resin is my tool of choice to create the fine details!  It IS pretty versatile, and not hard to do...it just takes a lot of time!


The other project I have been working on is the Parlor Floor.  This is what is getting me so excited, and yet frustrating the bejeezus out of me at the same time!   I have decided that I will spend eternity cutting flashing off of resin pieces and cutting out small pieces of wood with a utility knife!  Oh well, guess things could be worse.  :0)   

The wood in the photo above is a veneer made of Sapele Pommele which is native to tropical Africa.  It has a wonderfully curved grain that just makes me melt...I love it.  It comes in sequence matched packages that I am able to pick up from Rockler's Wood working and hardware store.   


Rockler has an Internet store at Rockler Woodworking Store, but I pick mine up locally, since I live in the big ole city!  There are few advantages to living in the city, but that is one of them!


The copper look material is - guess what! - Those paper plates that were part of the "inspiration" for this room.  The entire room, as I mentioned before, is built around those plates, the Christmas ornament, and the Double Decker floor!


I cut the center out of the paper plates to create a piece that I could cut from.  I then created a transfer pattern from tracing paper to help me transfer my design from the floor where I drew it originally, to the paper plates.  

To aid in the shaping of the pieces, I cut out paper templates first out of thin paper, adjusted them to where they fit the required profile, and then used those as the pattern to draw and cut the shapes required.  


I am also using a mahogany veneer, available through wood specialty stores such as Rockler or Woodcraft.  I love the beautiful contrast between the Sapele and the Mahogany.  The lighter wood circle is Birch Wood Tape. 

Above you see pictured where I am now in the process.  It represents about 12 hours work...lots of trimming and shaping for this floor!  I have promised myself that my next floor will not be quite so complex! HA.  Good Luck with that, Doug!

You can see in the photo above what causes my frustrations!  I got most of it worked out, but I have a gap near the circle above that I will have to figure out how to close.  Sigh.  

I also want to welcome Vivian as my latest follower!  Thank you for joining my wild ride, and for your lovely comments!  Vivian has a wonderful project in work that I love.  You can see it in progress at V's Miniature Manor.  Be sure and pop over and enjoy!

Well, for today, that is all!  I must tell you, I love that I am able to share this with you all.  While my family appreciates my work...they are not "miniaturists"!  They don't completely understand my obsession with cutting little tiny things all the time.  So it is good to know that I have some "friends" in cyberspace that know what this is all about!

Until next time!

Doug S

Tuesday, September 16, 2014

Ceilings with a "Sweet Touch"


“I happen to find ceilings much lovelier than the night sky myself. 
Sometimes I just stare at them for hours and wonder what could be up there.” 


Hello folks!  Welcome back!

I am now occupying my time with the creation of the Grand Parlor ceiling design.  The design must accommodate earlier decisions I made about putting the ceilings together. The photo below reveals the challenge created by two levels of ceiling within the same room.  


I designed the ceiling of the Grand Parlor and Kitchen Room modules to provide a hiding place for the eventual installation of lighting and wiring. It creates a profile which dictates a dramatic treatment in order to help make the ceiling profile believable.  To respond to this challenge, I chose to create a tray ceiling in the front portion of the room.


I started by drawing my ceiling tray shape using my favorite tool, the dinner plate, and a metal ruler.  To create the curved shape, I cut straight lines into the areas that required a curve, called kerfs.   


After the kerfing is in place, the Foam Core board is easy to bend into the desired shape and glue into place. I added illustration board to even the edges of the ceiling tray with the lower ceiling level. 


I used Spackle to clean up the edges and smooth out the cuts in the Foam Core Board.  


And now for that "sweet touch"!  For the lower portion (shown on top in the photo above), I wanted to create the look of a carved ceiling.  I happened to buy some cookies from Safeway a few weeks ago, and got to looking at the packaging.  I thought it would provide a perfect base for my ceiling idea!


I cut the center portion of the cookie tray out of the packaging... 


And cut out additional pieces of two additional trays and overlaid them on one another to create a "single" sheet.  


After cutting several smaller pieces to fill in the missing areas, I ended up with the texture base I want for my carved ceiling!  


So finishes the first step toward a beautifully carved ceiling.  At least I hope so!  The goal is a ceiling that is "much lovelier than the night sky"! 

Obviously, there is a lot of trim and finish work left to do.  Everything, though, starts small, and "becomes". I'll share more of the process of "becoming" in later posts.

That's all for now folks!  

Doug S

Sunday, September 14, 2014

Of Writing Tables and Fireplace Surrounds

Hey there traveling friends, I just wanted to share with you a couple of my FIRST acquisitions!

I haven't bought a lot of furniture or furnishings for this build yet, primarily because I want to build a lot of it myself. But I broke down yesterday and bought a couple of items at the Portland Miniature show because I could get them for quite a good price, and I was very happy with the detail and quality of both pieces.

I got several items at the show, but most were building supplies, and I am sure most of you have your own! So I won't bore you with those.  :0)

Here is the first item I thought worth sharing.  I am totally turned on by this writing table.  It is intricately detailed and incredibly lovely.


The carving is exquisitely intricate and fine.  Here is a shot of the end of the table, where you can appreciate the beautifully executed detail.


Finally, a top view, showing how beautifully painted the top of the table is.  I now discover it is upside down, but I am sure you will forgive me for that.


This table, at least at the moment, is destined for a spot under the stairs in the Entry.  Here it is in it's spot, without the staircase to block the view.  :0)) 


I also thought I would share the fireplace surround I purchased.   This was one of those things I wasn't sure I would buy for the price, but then found out it was discounted about 60%, and could not pass up then!  I am so glad I ended up purchasing it, because it is perfect for the Entry.  It was not what I had planned, but when a good thing happens, you don't turn your nose up!  

Here is the fireplace surround I found.  Not the best picture, but I wanted you to see it as I bought it. 


I hesitated to buy this because I was not sure it was going to fit in the Grand Parlor, where I planned to put it.  But then I got home...and tried it, as we all are prone to do, in the more complete Entry...and I fell in love with the way it looked there...


As you can see, it was perfect!  It fits the space, and it is very believable in this room.  It will blend well with the Art Nouveau feel I intended for the space, though played down a lot from my original plan.  That is probably a good thing!  I notice a tendency to "over decorate"...and I am learning that I am going to have to put a reign on all those ideas I have!

You will note that there are a couple of pennies under the front of the fireplace surround.   I have to do some "adjusting" because the ends of the piece are not quite square.  Who knows...that could become a feature!  We'll have to see which way the wind blows.

The pieces behind the fireplace for now are Foam Core board...just getting a feel for the flavor of the intended profile.  I decided to move the over mantel up further, because I think it is more proportional. None of this of course will be the final outcome.  But I had to share with you why I changed my plans!  Why, I do not know...because I hadn't shared them with you yet!  But be that as it may...


I am especially pleased with the detail, which it is hard to see in either photo above, so I have taken a shot or two to show that to you as well. 


I think that is the last of the Entry you will see for a bit.  Sorry!  I made the decision this morning that I needed to get the basics of both the Grand Parlor and the Kitchen Rooms in place so that I can attach everything together before moving on with the Entry.  There is intended a lot of molding and detail in the Entry that will not be able to be applied until I have the door and window trim in place.  I can't put the trim in place until the two rooms beside the Entry are complete enough to attach to it.  Soooo, the Entry goes on ice for a little while...  Never fear, we will be back! 

Hope you've enjoyed the peek at the kinds of furnishings I plan to use.  Now we are back to the basics as I move further on the Grand Parlor...  

Have a great Sunday!

Until next time!

Doug 

Friday, September 12, 2014

The Power of Gathering

Hi there folks!  Welcome back!  Bear with me for a moment while I philosophize!

I love the process of "gathering" stuff... there is nothing that makes me happier than creating ideas from nothing.   A bit here, a bit there...a special inspiration piece that sends your mind off into Dreamville... this, among other things is what I am so loving about this particular adventure!  

Dreaming about where I will take that blank canvas sends my spirit soaring...in the midst of other, sometimes painful life events, this is always a  place I can go to that is safe and exciting and alive.


"This is the power of gathering: 
it inspires us, delightfully, to be more hopeful, 
more joyful, more thoughtful: in a word, more alive."   
                                                                         
                                                                            Alice Waters


There IS some fear... can I make it work?  Is my idea good?  Will it please me in the end, or will it disappoint...but that is part of the joy of a dream...it also adds a dynamic quality that creates its own spirit of revelry...it is the catalyst that sends your heart and mind off in new, sometimes even more exciting directions.

So all that "philosophical mumbo jumbo" was about introducing you to the next project I will be working on. I am waiting for "stuff" for my Entry, so I started trying to finalize my planning and gather the things for the Grand Parlor.

The photo above is the collection of stuff I have for the Grand Parlor.  What a delightful collection, yes?  Does it tell you anything about where I want to go?

I knew what I wanted in regard to the "space" in this room.  I knew I wanted a two level floor, I have some ideas about how to use that to create an "interesting" dynamic space.  Here is what that became.


As usual, that is what I "knew" going in.  Beyond that, a few unclear ideas floating around in my head...those will come later as they become realized. For now, I am focusing on the "things" that are shaping my final ideas.

One of the goals I have for this blog is to share the creative process as I go along.  So many folks feel they have to have everything "done" in their mind before they start.  In the real world, building a house, that is very true.  It is much too costly otherwise, and mistakes can cost thousands.

But in our mini world, we can be the true artist, and let our creative process bloom and flower, creating things that delight our senses and take us into new and exciting worlds.  Sometimes, having entered the process to realize our dreams, a new idea surfaces, a thread that just cannot be ignored...it enriches our vision.  Therefore, it must be realized, mustn't it?

All of what comes next is built upon the two level floor pictured above, and two additional things.


Yes.  A cheap Christmas Ornament that looks more like an Octopus...(does anyone REALLY put those on their Christmas trees?!!), and Paper Plates from Hobby Lobby.  Humble inspiration...as is most inspiration!  Big ideas from small treasures!

OK..so that is all for now...except a tantalizing picture of me playing with stuff to "create" the new Grand (Very Grand I might add!) parlor!


I hope that is enough to get you a bit excited about where this might go!  I am excited to start seeing this come together if no one else is! 

Oh..and I thought you might enjoy seeing how horrific my creative process is for those around me!  Shortly after this photo was taken, my "creative process" was dismantled and put away.  I think my poor wife deserves a day or two without having to push my mess around in order to take care of me!  :0) 


Have a great day folks!

Until next time!

Doug S

Saturday, September 6, 2014

Resin Casting Triumph!
[Or the Culmination of A Hard Won Battle!]


Welcome back folks!  I have such exciting news!  You will soon see the last of my resin casting trials...the battle is finally won!

I feel like I have climbed Mt. Everest...OK..maybe not quite that way...I'm not melting all over the floor due to my great exertion...but it feels GOOD to finally make this work!


Here is the product of my many travails.


 I know..it doesn't look too much different than before from this angle....


But here is an angle that can help you appreciate the change!


I love the highlights created by the resin over the Steampunk gizmos.  The polished shine of the floor is exactly what I had hoped for when I began this "little" project.

I wish you could all see this in real life...It is much more dramatic than in these pictures!  The shine is mesmerizing, the whole piece sort of glows due to the deep color in the floor, and the depth created by the resin is so incredibly dramatic.

(I showed my wife, and she told me she wanted to hang it on the wall!   My response was somewhat disappointing to her.)    :0)


I do have a bit of adjusting to do, because my floor ended up being a bit thicker than I intended.  It is a full 1/2 inch thick...Good thing I have some room to maneuver in my 12 inch high Entry.  

I am going to have to build up the floor for both the kitchen and the grand parlor as well, in order to level the ground floor.  I may also have an issue with my stairway...I hope I don't have to take it apart to adjust...shiver.   I planned for 1/4 inch..but my Steampunk gizmos didn't cooperate!

I will make any adjustments happily if I must however... because I am so excited about the outcome of my little resin casting drama!


And now, for the long awaited "After" photos....


That's all for now!  I just wanted to share my excitement at getting this to work!  And in spite of my many complaints...I think I would do this again someday!

On to the next challenge!

Enjoy your day!

Doug S