More Pages

Saturday, March 28, 2015

[Overheard in The Forum]
Kitchen Faucet Tales


Greetings,
Strange happenings at the faucet.  
Sink has a faucet with a Steam Punk look and a spout able to rotate.


When the hot tap is turned on fully the water runs warm only

and then runs cold and back to warm again. It never runs fully hot.

The sink is a  couple of feet away from piping hot water.

The supplier says to switch the cartridges between the Hot and Cold

levers. This does not sound right. Its a fancy Steam Punk brand.


Some insight would be appreciated.


Oh the joys of learning on the fly!  I've had a fun couple of weeks [yes WEEKS] figuring out my Steam Punk Kitchen Faucets.  The lessons learned are too many to list, so I'll provide you with the short cut!  How is that!?

Nah!  That would be no fun.  So I'll show you how I made a set of Steam Punk Kitchen Faucets with only a COUPLE of side trips.  Rest assured, this was only scratching the surface when it comes to detours on this project!

The funny thing is, once you "know what you are doing" (maybe a stretch!), this little project is actually fairly simple to accomplish.  I'll attempt to impart the great wisdom I have gained as I wandered far and near.  This should make it very simple for 'the next guy'!


Presenting the materials required for this project.  So Simple.  Beads and wire, Beads and Wire.  Simple. SOOOO Simple.  Yes.  So Simple.

I should share that this idea was not my own.  I stumbled across a tutorial at Nasu's Dollhouse, which I adapted to make this faucet set.  Hers is much more professional looking...  I'd tell you it is my photography that caused mine to appear less polished, but I would be lying!

OK, back to the faucet tales.  I used various beads, some very small springs, and 20 gauge [modify that to 16 - Lessons Learned!].  I had to do it over again, because the wire wouldn't hold up the final product!  So use 16 gauge wire if you are foolish enough to try this at home!


Droopy faucets :'(( 

Once re-assembled using 16 gauge wire, the outcome was much better. But I get ahead of myself.


Using the assortment of Steam Punk themed beads and wire, I strung the beads onto the wire, and bent the ends to create a return on both ends.  Each bead was glued [Lessons Learned dictates Super Glue for those quick on the draw!] to the wire, so that it remains stationery.


This is one of those beads that is threaded to use as a clasp on a necklace (no I don't know what they are called!)  I glued the connector bead on top of the squared bead in the center to create a pipe traveling upward.  By using this threaded piece as a pipe routed upward, I have a "working" faucet.  [OK, no.  It just swings from side to side. Nice, huh?  :0))  ]


For the faucet itself, I used 12 gauge wire, and bent it into shape.  I super glued a bead finding at the base where the faucet would meet the wall.


I super-glued two additional beads to the faucet end to create the spout. [For the observant ones, this was NOT superglue on this photo.  Another lesson learned!]


Added two additional square beads to the top of the connector bead . . .


and then added some additional beads to create a decorative element.  I painted several of the beads to a copper color, to create the elegant metallic effect I wanted.


Painted the faucet assembly. . .


And assembled the entire thing using a combination of Arlene's Tack Glue and Superglue.

This is the point at which I discovered my droopy faucet problem.  I could not get the wire to hold up the assembly, as the weight of the beads and wire was too much for the 20 gauge wire I had used.


As you can see in the above picture, the entire assembly looks just slightly different.  I used the same exact processes, but used 16 gauge wire instead.  You can just see the difference in sturdiness.  Much better.  

I also shortened the returns on the wire, and left off a couple of the springs on the rebuilt faucet assembly, again in an effort to solve my droopy faucet syndrome.  


It worked like a charm!  I super-glued the entire assembly to the sink using very small holes drilled into the back-splash of the sink.  Superglue is a wonderful thing.


I added the small Victorian faucets which I bought at the Seattle Show, and declared the sink done!


Oh.  Of course I must share the tiniest little detail, yes?  I also did another little project to add final details to the Steam Punk Kitchen Doors.  I added some door handles.  Worth sharing, right?  :0) 


That's all there is folks!  Not so much for four weeks is it?  Some battles are hard won, but those are the better for it! 

I am excited now to move on to the Box Windows on the Exterior.  I have some wonderful ideas for those, we'll see if I can pull them off!  

Until next time!

Doug S


P.S.  I really did find the opening piece on this post in a forum.  I thought it was funny, and tweaked it a bit to fit my post.  No, my house will not have running water [THIS time!]


Friday, March 13, 2015

Caught in a Trap
[and I Can't Walk Out!!]

Hello folks, 

Something about the miniature world just captures me, and sends me on little trips into a fantasy world. That is how I felt at many of the booths at the Seattle Miniatures Show this year.    While the show has suffered over the last few years, both from vendor attendance and attendees, it is beginning to build again, and many wonderful artists bring their work. I wanted to share with you all a little of that experience.  I thoroughly enjoyed the day, and spent just enough to feel slightly guilty about it. Hence, this post acts as my confession!  

Of course, I took lots of pictures, and came home with about two that were decent.  I really need a new camera!  Mine is at least 15 years old, which was the dawn of time for digital photography.  Oh well, I am going to share the two that came out decent, because the projects were way cool!


Country Maid by Bespaq - Shawn Flading

My favorite piece of the day was actually at the Bespaq Table, and they were kind enough to allow me to take [many!] photos of it.  They actually took off the dome so that I could get a picture without the glare, I took enough photos that they offered to charge me for the privilege (yes, they were joking!).  In this case, the many attempts to take a decent photo paid off, and I actually got a picture that worked!

I really loved the scene, it connected with me, the little country maiden taking a short rest surrounded by all her work implements.  For me, miniatures are all about these little stories, whether they contain the mini people or not.  If you can see the story, it works for me.  This one definitely worked!

You'll be able to see the price tag there too.  Ehh-hemmm!


'Tea Tiny' by Shana Stewart

Here is my other real favorite from the show.  Luckily, the two favorites, I was able to come away with pictures of!  They are not perfect, but at least somewhat usable.

This little party table really spoke to me.  Actually, the mix and match chairs echo the dining "set" in our own home, so this was a shoo-in for me. I loved the play of color and shape used in this piece. Everything looks as though it goes together, and there is nothing that is the same in the entire piece.  I thought this was very well done and it really appealed to my personal aesthetic.

The rest of my pictures remain rejects!  So that is the extent of the "Seattle Miniatures Show" that you will see on MY blog!  :0((

As I said, I did spend just a tiny tiny bit while at the show. . . thus the title of this post!  Here are a few things I was able to purchase.  Most of these will not show up in the blog again for some time, but are being hoarded for future use.


Here are a couple of beautifully Steam Punk Picture Frames from 'Mini Masterpieces' owned by Dick & Irene Hines.


Also by 'Mini Masterpieces" some wonderful little kitchen items.  A meat grinder, a cheese grater, and a truly exceptional serving dish with a patterned lid.  Unfortunately, the detail is totally lost in the photo above, especially the meat grinder.  It is a wonderfully detailed piece. 


Beautiful Buns!  :0) 

I loved the items this next vendor sold.  Her work was minutely detailed, and each piece is layered so that were you to cut into the pieces, they looked like real cut pieces.  She had several cabbages that were layered piece by piece so that it truly looked like a real cabbage when cut.  I purchased the two loaves of bread pictured above, but I wanted to buy just about everything.  

Unfortunately, she didn't have the name of  her business on her receipt, so I cannot tell you who it was that did this.  If you ever sell things, PLEASE include your business name! Right?!!    In looking through the dealers at the show, I was unable to identify this dealer. That is too bad, because you all would have really loved her things. 


This black metal hall tree was from Country Store Miniatures.  I loved the metal detail and the delicacy of the piece.  Jim and Carol have a shop at home, by appointment only, and it is within reach of my house (only a 4 hour drive!  ha!)  I may have to stop there some time in the future as I travel through!   They had a WIDE array of miniatures, from very fine to mainstream, and I actually spent more time at their table (think shop!) than any other place in the Show.  They had a lot of those 'itty bitty" things that every miniature house needs! 


Faucets, Pipes, Door handles, Enamelware, and architectural goodies!
As you can see, I succumbed to the temptations.  They had BOXES of little things that you had to sift through, but there were some wonderful things in there!  You'll see a few of these show up soon on the blog, because most of them were bought to help finish out some of the things I have already done. 


Here is a Steam Punk Weather Vane that I picked up from one of the vendors, another vendor that didn't put their business name on the receipt.   They had a few Steam Punk items, all of which I liked.  The weather vane is SO far in the future in regard to "use" that I think I probably should have just left this one alone, but it "fit" my ideas so well, I couldn't walk away from it!

Remember I told you I don't like skulls on things?  Well, this vendor had a grandfather clock I really liked, but it had skulls on it.  In order to get them out, I would have had to take the whole piece apart, and I wasn't sure I could get it back together.  So back it went. One trap I managed to walk out of!


This is the favorite piece that I was "trapped" into buying by my "sinful desire".   It is a Bespaq piece from Shawn Flading that I absolutely love.  


Every door and drawer works, the shelves are glass with a mirrored back to set it all off.  It is a truly incredible piece.  I bought it for the Grand Parlor, that wonderful little space beside the fireplace. Remember?


Hah!  Oh the things that might have been.  The piece was twice the size of the space it needed to fit in.  I will have to keep looking for a piece to go there, because this one was totally overwhelming in that spot.  It BARELY fit in the footprint, and looked totally out of place.  But never fear.  It WILL find a place in the house.  :0) 


Unfortunately, size matters.  :0(  

I got so intrigued by the next three items that I plopped the money down and purchased them from Newton's Apple.  Price was right, story was great! Purchased from an estate sale.  Loved the pieces.


This one has a working cross bar.  The bar swings up for baby's convenience.  


This is my favorite of the three purchases from Newton's Apple.  I can just see a chair of this style in one of the rooms. 

Unfortunately. 

They were all out of scale!  I got them home and started playing with my new toys, and discovered that I had forgotten to think about scale.  Sigh.  Live and learn.  I may be able to rescue the chair above, since it is proportioned such that trimming the legs down may allow it to "fit" scale, but I am afraid that it will look chopped up.  Jury is still out on that.  Luckily, the prices were not too terribly high, so it is not too much money down the drain! 

There are a couple other odds and ends that I was able to pick up, but not particularly noteworthy, so I've not included them in this post.  You'll see them show up over time, I imagine. 

One of the greatest pleasures of the Show for me was to get to meet Elizabeth of Studio E and Janine of Minworks.  I made a total fool of myself.  You see I have this little problem.  It is called hearing.  I may not LOOK very old, but I am!  :0)  So when Elizabeth found me, I of course couldn't hear her name, so I had to flag her down again and make sure I knew who she was!   Slightly embarrassing. But, in this case, I was so glad it happened because I got to meet a new friend, Janine, who was at the show with Elizabeth.  

There is MORE to that story, believe it or not!  Somehow, I had Janine confused in my mind with Elizabeth.  I had been to both blogs, and seen Janine's picture on hers, and somehow assigned it to Elizabeth, who does NOT have her picture on her blog!  So if it had been left up to me, I would never have found either of them most likely!  Thank goodness for small favors!  

In spite of my buffoonery, it was a real pleasure to meet and talk a bit with both of them!  It is so good to put a [real] face to the names of my blogger friends! 

I also got to meet and talk with Sylvia Rountree, whose work you can see at the Good Sam Show site. We had a pleasant chat and I enjoyed getting to know her a bit. 

All in all, the show was a wonderful experience, again.  I look forward to the next!  

My own work has suffered mightily from real life in recent weeks.  So my next post may be a few days (maybe weeks!) out.  

Until then!  

Doug S

Monday, March 2, 2015

A Unique Opportunity (Deja Vu)


Hi there folks!

Anyone need a new miniature house project?!!  I just stumbled across something this morning that I thought might be of interest to some of you, and thought I would post it.

Then I thought I would not post it, and deleted the post for multiple reasons I won't go into. But in the whole hour it remained on line, a couple of you found it, and asked me about it.  So I thought again, and am re-posting it per request!  :0)

I do think it is a unique opportunity, and goes for a cause I'd love to support, so here we go again!  Thus you may be experiencing "Deja Vu".


Screen Shot 2015-02-28 at 02.11.17.png
Image credits:

CHÂTEAU DE GUDANES


I thought a couple of you might be looking for a new project, and perhaps a couple more just need a few more future projects!  This looked intriguing to me, and I thought that it would be neat to see what someone might do with it!  

The doll house is in a pre-order state and for those who are part of the first 100 to purchase,you can pick it up at the discounted rate of 65 US Dollars. For details regarding this offer (which I have no stake in!) see it at CHÂTEAU DE GUDANES.  There you will see the full story. 


Screen Shot 2015-02-28 at 02.13.01.png
Image credits:

CHÂTEAU DE GUDANES


While you are there, take a look around at the website.  It is an exciting restoration of a once abandoned French Chateau.  There are some wonderful photos on the site, and some history about the project and how the home came to be abandoned.

If nothing else, you will enjoy the history and photos!  Take a look if you are so inclined!

Thanks!

Doug S

Sunday, March 1, 2015

Building the Steampunk Kitchen Door

Hi folks!

Since my last post, I've been busy working on the Steam Punk Kitchen Doors.  My first version, I actually liked fairly well, but not for this build.  It didn't fit, as is, with the feeling I wanted this house to have.  So I went back and started from scratch again.  I've set aside the original door for a later project that has a little more of a cottage feel.


Why didn't I see the mullion not aligned BEFORE the photo!  It's fixed now!  :0) 


This project was a quite complex project from the perspective of there being many steps, and took me quite a long time to figure out.  I am reasonably pleased with the final results though, so it is was well worth any effort put in. 


I've brought forward my concept drawing for first timers.  In the last post I explained how I needed to make some simple changes due to the narrow door size I left, resulting in a basic change in the shape of the windows. However, the basic concept was still what I wanted for the kitchen doors. I have continued to modify the concept slightly here and there as I went through the process and fleshed out the design.  These doors are the final result.

I thought it might be of interest to folks to know how these doors were built, so I am going to attempt to put this post together as a tutorial.  My camera (definitely the camera, it could NOT be me!) still won't take decent pictures for some shots.  I think I am going to have to replace it.  :0(

Meanwhile, here we go on a very long post, I imagine.  Hold on to your hats!


Step 1:  Transfer The Pattern

Cut the door shape out of 3/32 " basswood or other somewhat soft, small grained wood.   I first made a single template and drew the window shapes onto mount board, and then cut them out so that each drawing would be identical.   I cut the basic rectangle(s) out of basswood prior to drawing on the door shape (in this case the window holes), and kept at it until I had four equally sized pieces.  

I then drew, using the template, the base pattern on each door blank, in my case four, since I was making two doors.  If you are making only one door, you will need to cut and prepare only two door blanks.  You will need two door blanks for each door you wish to make.

Make sure that as you do this, you are keeping the template exactly on center, and that you keep the pencil lead close to the leading edge of the window recesses in each case, otherwise, your pattern will be in a different place on each door blank and you will get to do a lot of sanding, and perhaps even have to cut additional door blanks.  The most important aspect of this step is to measure equally spaced sets of window holes on each of the door blanks, so that they can later be glued together. 


Step 2:  Prepare the Window Panes 


Cut out the window shapes using a scroll saw.  Begin this process by drilling holes into the center of each window space as seen above.  This allows you to put the scroll saw blade through the hole and allows you to keep the base door shape all one piece.  

Once you have cut out the windows, use heavy grit sandpaper to align the edges as perfectly as you are able to.  Sand the edges of the window recesses first, ensuring that the center door post is sanded smooth, then progressing outward continue sanding and aligning the edges until all window and door edges (including outer door edges) are sanded smoothly into identical shapes. 

Finish sanding can wait until the next step.  For now, you are just ensuring you can eventually glue together two of the door bases and have them fit well.


Before moving to the next step, insert the door into it's door frame, and mark the location of each vertical edge against the jamb.  This is the available work space to add door detail and decoration. 


Step 3:   Carve the Door Kickplate

Now you are ready to cut and carve the door kick plate.  Begin with a wood blank.  I used balsa wood on this second set of doors, in the first, I used basswood.  Balsa is much easier to carve and allows for very smooth shaping fairly easily, but is so soft that I do wonder how well it will hold up.  Luckily, no big people will be kicking at the door plate!


Start by cutting the wood to be carved to size.  Remember to stay inside the lines you drew, as these are the edges of the door frame, and you will not be able to close the door properly if you stray over the lines.


Measure in and carve guidelines for the basic outer edge shapes of the kick plate.  Here, I used a compass to create a gentle curve from one corner to the next.


Draw in and carve the door folds.  Using balsa wood, I found that simply drawing my mechanical pencil carefully through the wood several times along my measured line provided me with perfectly shaped door folds.  If using harder woods, you will need to use a chisel to create the folds.


Begin to shape the wood into the profile you want it to become.  This process looks like you are destroying everything, but is somewhat necessary to shape the basic contour of your profile.

I used a curved gouge, a straight chisel, and a curved chisel to achieve the shapes I created.  I used the gouge first, to penetrate the wood, and shape it into a very general approximation of the shape I needed. Note that I left a raised center with a very, very slightly lowered basic profile above.  I then used the curved gouge to shape the upper ridge and to cut into the edges along the door folds, and to smooth out the gouged wood in the center of the door plate.   I then used the straight chisel to clean out the edges along both the door folds and the upper ridge.

The next step is to sand.  Using heavy grit paper, sand carefully the entire piece.  You are looking for crisp edges and smoother surfaces.  After you've achieved the general shape you desire, move to medium grit sandpaper, smoothing further the shapes and using the edges of the sandpaper to achieve straight 90 degree angles along the door folds and the upper ridge.


Continue sanding with fine grit sandpaper until you have a smoothly contoured surface.  You should end up with something resembling the above left wood piece.

Use the newly carved blank to create a second blank.  Again, remember to keep your pencil as close as possible to each edge so that you do not end up with two blanks of different sizes.  However, using the first as a template helps guarantee you get exactly the same shape with both blanks.  If you do get one blank larger than the other, sand to ensure that each blank is exactly the same shape and size.  A little bit of variation has a lot of impact in the final picture on miniatures, so measure and compare carefully.


You can use the same technique to ensure that the folds along the bottom of the blanks are the same.  I used a long ruler to align the folds on the two pieces, thus ensuring that the two door blanks have as little variation as possible.

Shape the second blank in exactly the same way as the first.  Sanding is the critical step to ensure that the shapes are identical.  Compare often, and adjust both carvings as needed to obtain identical shapes.


Step 4:  Cut the mullions


This is the hardest step to get consistency, but with patience it can be managed.  Cut mullions using a mount board template for all four mullions (for each door, a total of 8 for two).  Unfortunately I do not have a photo of this part of the process.  I tried, but forgot to photograph this step!

To create the template, draw the desired shape for the mullion on a piece of scrap board.  I wanted the serpentine shape so common with Art Noveau, so drew a mullion shape that incorporated that feel.

It is very important to cut and then actually temporarily install the mount board mullion piece into its final home in the window.  It is easy to get it too short.  Do NOT use the mullion you drew in your original pattern, as it WILL be too short.  Its length does not account for the cutting width of the saw blade.

Once you've measured the template and know it fits, use the template to draw 4 mullions (one for both sides and for both back windows) per door. Cut as closely to the drawn lines with the scroll saw as possible, attempting to ensure that the shape of each cut is similar.  I couldn't figure out a jig for that, but if you could, that would be a good idea.  I have a ways to go to learn how to think that way!

Sand your mullions to finesse the shape, again, you are looking for identical shape as much as possible.


Step 5:  Sand and Stain the door pieces. 


Sand all of the pieces well.  I used heavy grit sandpaper first, mid grain sandpaper, then fine sandpaper, and then followed each sanding with 0000 steel wool.  This provides a very smooth surface to stain. 

I used Traditional Cherry wood stain which gave a deeper tone than my original door, which I like much better for my application.  Note that no gluing  has taken place as yet.  This is because it keeps the surfaces clean and clear for the stain, and does not provide opportunity to get glue in places you don't want it.  Once glue is introduced on the surface of the wood, stains are likely to highlight those areas since they coat the wood and do not allow for consistent absorption. 


Step 6: Creating the Ornate Details


I used the process I have used several times before to create details for the Steampunk doors.  I found a small frame at Michael's Craft Store that I felt like had the right vibe.   I've sort of arranged the "Amazing Mold Putty" molds I made near the areas of the frame I used to make the molds.  The center medallion from the bottom of the frame, the additional detail at the bottom of the door from both bottom sides of the frame, and the detail at the top of the door from the top of the frame.   These frames are very inexpensive, mine was about 3 dollars.

Use this process, or another process, to create details that you would like to use on the doors.  One method I thought of that I knew would work was embossing paper.  This was my first thought, but I could not find an embossing pattern that I liked for my Steampunk doors.  I am sure they are out there, they just weren't where I was!


Sorry for the picture quality~  Ouch~!

After casting the resin molds, trim out the details that you want to use.  All of my pieces started out like the large cast piece above.  (Sorry for the horrid pic, I haven't figured out why some of these come out this way when most pictures are fine! I took about 15 pictures of these and THIS was the best!)

I cut portions of the patterns out that fit the portions of the door that I wanted to decorate to get my final look.  Use your imagination!


Once your pieces are trimmed, paint them flat black, and then apply Polyurethane Satin Finish.  I like the Minwax Water Based poly, since it is a breeze to clean up.


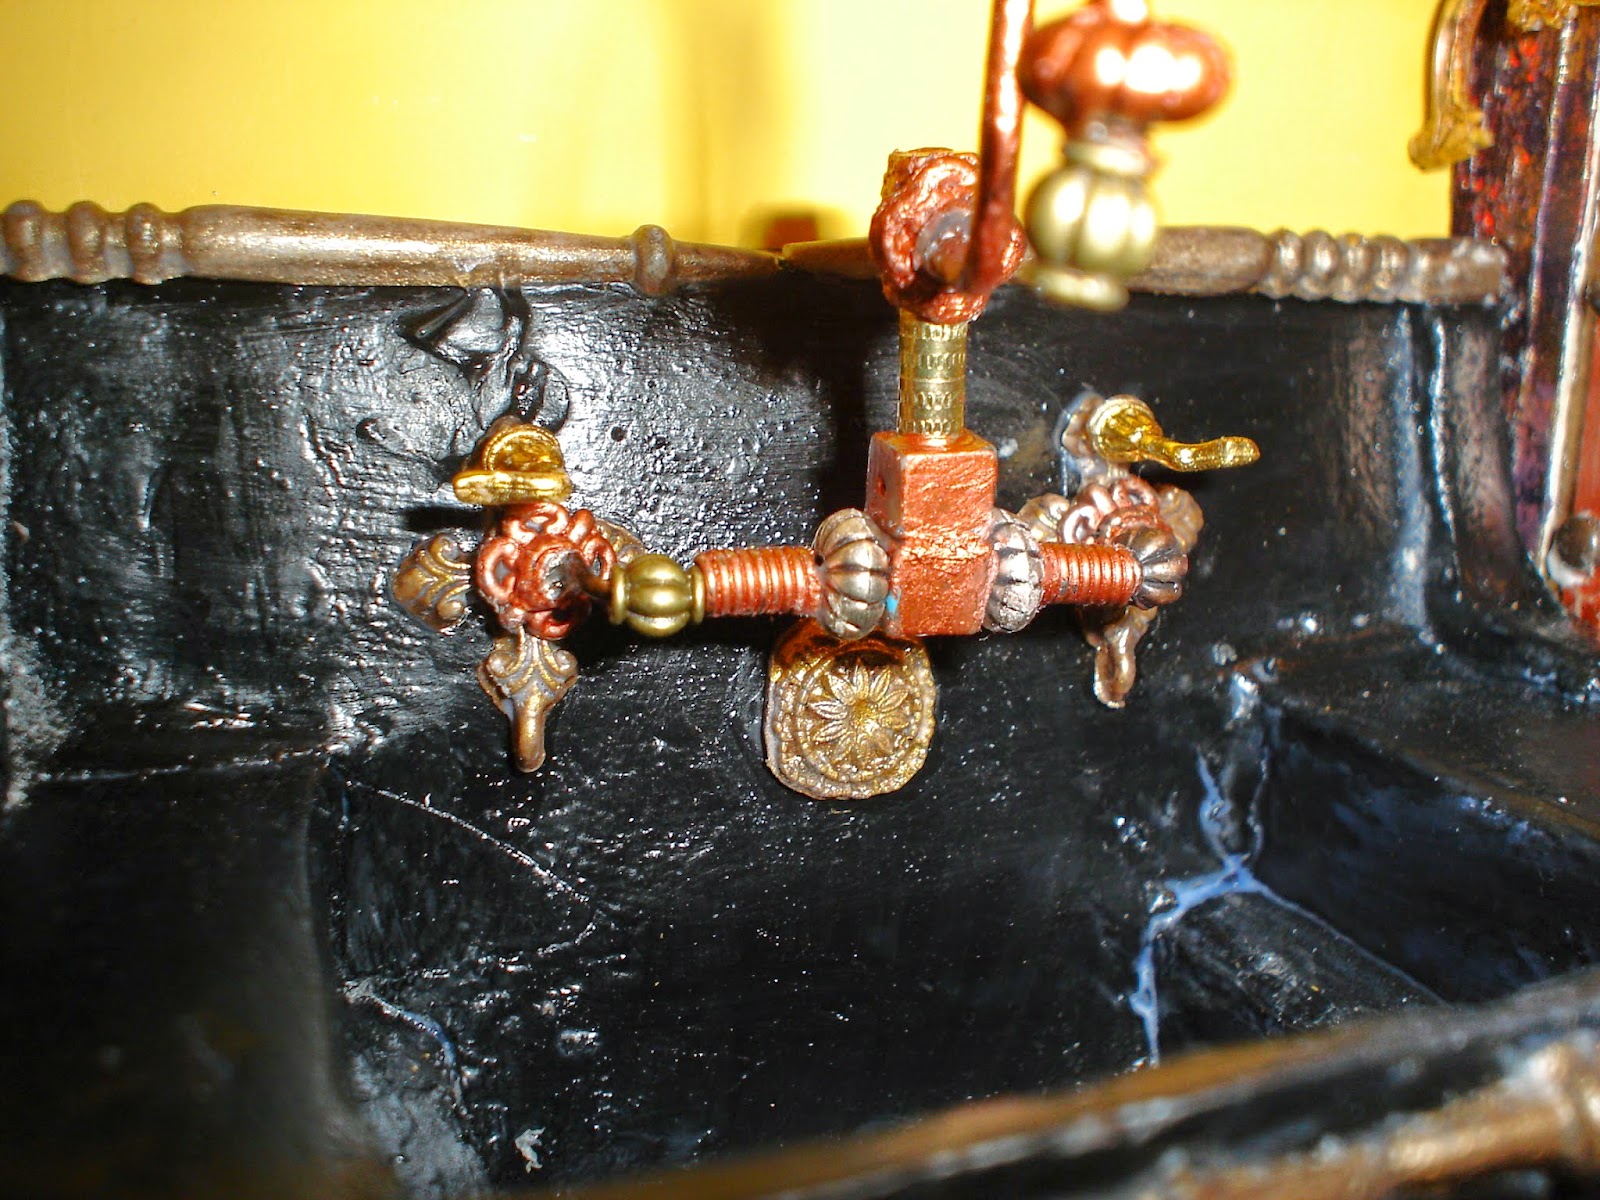
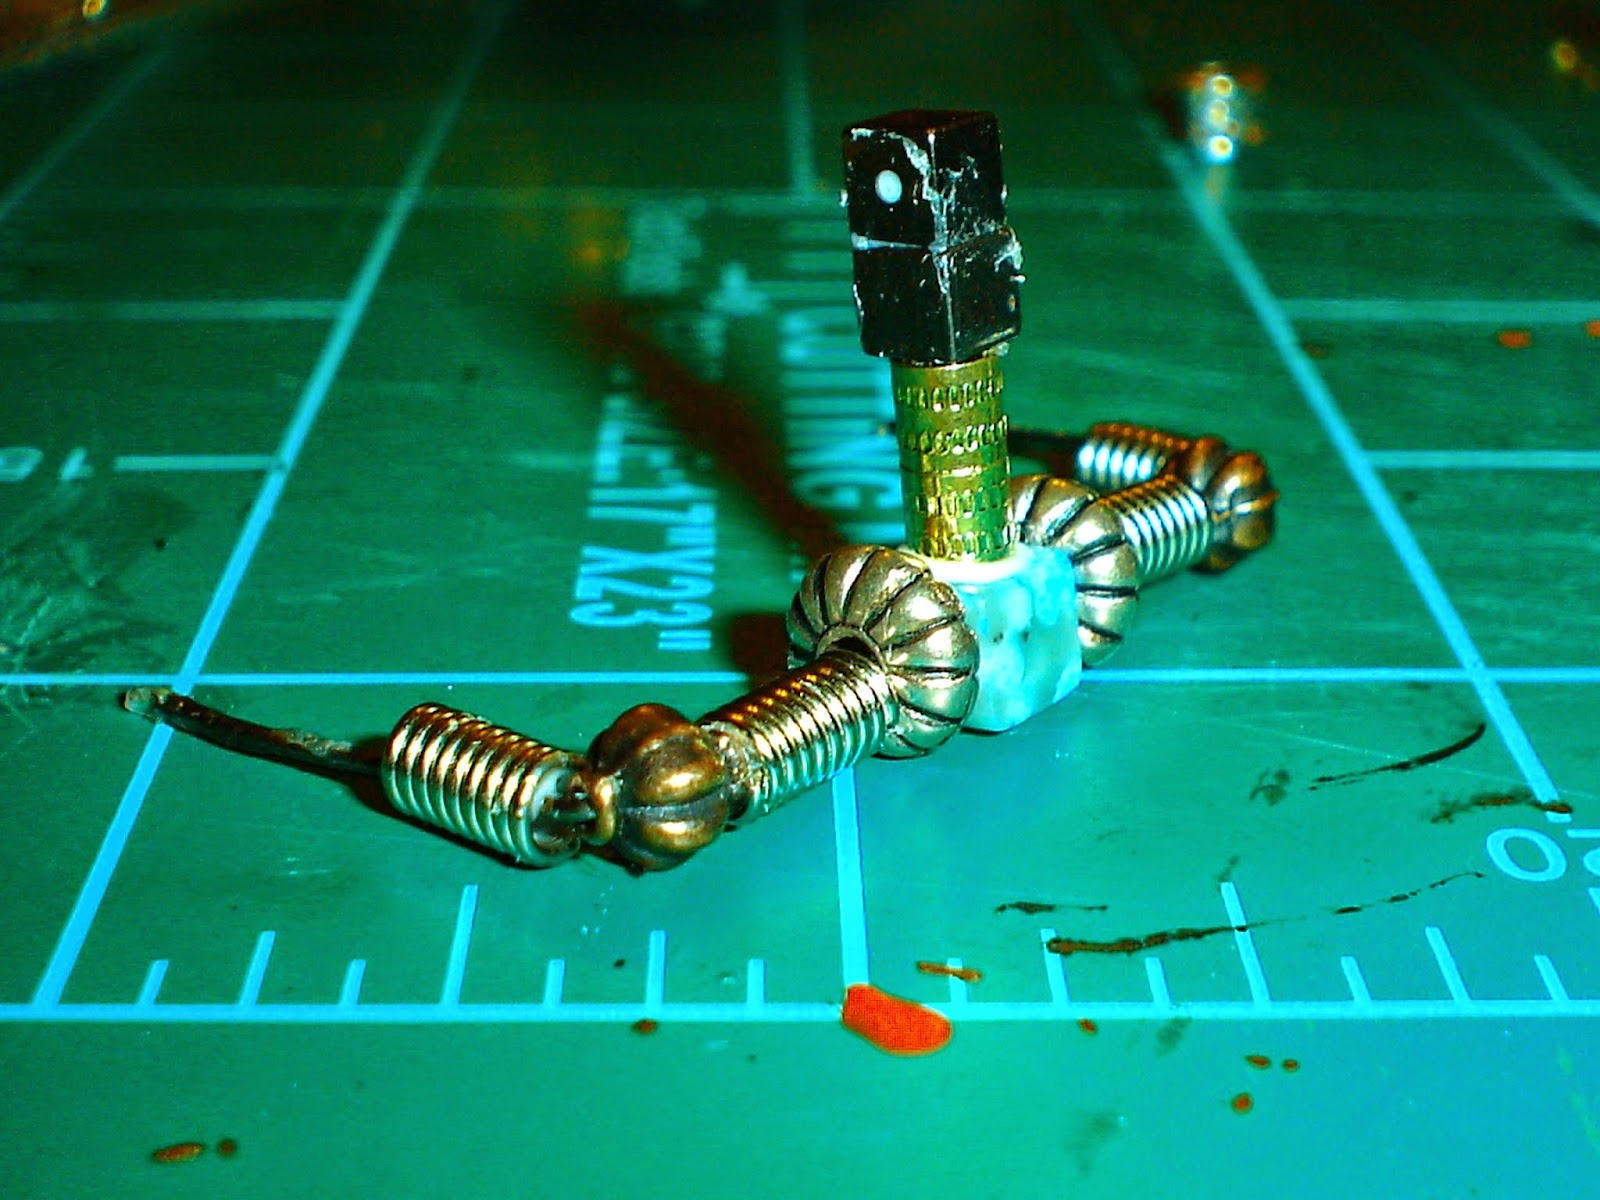
Step 7:  Adding the Decorative Metal Bars


Now for the fun part!  We get to begin assembling the door.  Finally!


More horrible pictures~ !  


To create the decorative metal bars, I used 16 gauge wire.  All you will need is a pair of wire cutters and a wire forming tool.

I will share with you that using the green wire was not my original plan, but it was a happy accident.  I love it. I had originally thought I would use copper wire, but the craft store I went to was out of just about everything! So I found green wire and gold wire, and nothing else.  The green was the lesser of two evils, so I bought it.  Now that it is in the door, I am SO glad that happened!


To make the decorative door rods, I cut three pieces of wire for each window, and shaped them into matching gentle curves for both sides.   They ranged from about 2.5 inches to about 4 inches in length.


I used a mini awl to create small pilot holes along the vertical edges and bottom curves of the windows on one of the two door pieces that make up each door.  I chose to place the metal bars on the outside window surface, they could be placed  on either side.  This was a delicate process, but doable.  I placed holes at the (reasonably) correct angle for each bar at the bottom of the window and the outside edges.


To insert the metal wire into the door frame, I chipped tiny channels into the wood to hold the wire between the door pieces.  I chipped them out with a utility knife, just enough to allow the wire to sit inside the sides of the window.  I placed the wire into the channels and glued it in.


Step 8:  Assembling the Door


I applied the two door sides together like a "wire sandwich" with the wire laying against the acetate I used for the window, and the 2nd door piece in back of that.  I glued and clamped the door at that stage, to ensure a good solid meld.  


After the glue dried, I applied the kickplate to the door in its proper position.


I applied the "metal work" next, which helped me to decide exactly where to place the door mullions to look best.  They are slightly lower than the original pattern, but are where I think they look best. 


Step 9:  Gaze lovingly at the final result. 


This door was a real challenge to design and build for me, but I am quite pleased with the overall effect of the doors.

Hot off the press!  Glue is still drying!


I ignored all I learned about the direction of the door swing.  I played with both inside swing and outside swing, but for these doors, they just did not look proper swinging inward.  So I took advantage of the occasional example of exterior doors swinging outward, and the little ones will just  have to cope!


I am excited about continuing the process of finalizing design and building doors and windows for the first floor, because they add so much life to the interiors.  I plan to tie in the windows along the front of the house with these doors more by adding ornate detail there as well, and the Grand Parlor at the other end of the ground floor will get windows that echo these doors.   I will not be finalizing installation of any of these windows and doors until after having completed the interior ceilings, and the exterior of the ground floor.

Did I ever tell you this is fun?  :0)

Hope the tutorial was informative!

Doug S